How to set up tax in Stripe

Setting up Stripe Tax is a straightforward process that can be completed quickly with the right documentation. This guide covers what you’ll need before, during, and after setting up tax collection with Stripe.


Setting up Stripe Tax is a straightforward process that can be completed quickly with the right documentation. This guide covers what you’ll need before, during, and after setting up tax collection with Stripe.
Stripe and Stripe Tax are closely connected, but they aren’t interchangeable. While Stripe functions as the broader payment platform, Stripe Tax is an additional solution within Stripe that calculates and collects tax on supported transactions.
To use Stripe correctly, you’ll need to configure where you’re registered, what you sell, how your pricing model handles tax, and how Stripe determines each customer’s location.
This guide will walk you through how to set up Stripe Tax and what you’ll still need to manage in order to maintain compliance after the service is fully implemented.
How to set up sales tax in Stripe: Quick overview
While setting up and enabling Stripe Tax is relatively simple, you’ll need a few things before you begin and should expect to handle some compliance responsibilities after the fact.
Here’s a brief overview of the entire setup process:
- Create a Stripe account and choose a Stripe Tax plan.
- Determine where you need to collect sales tax.
- Register with the appropriate state authorities.
- Enable Stripe Tax and confirm your business address.
- Add your registrations and collection dates.
- Assign default and product-specific tax codes.
- Configure pricing and customer location settings.
- Enable automatic tax across all payment flows.
- Update existing payment flows and test your setup.
- Review reporting and arrange filing and remittance.
Once Stripe Tax is enabled in a supported payment flow, the service will begin collecting tax automatically on those transactions.
However, keep in mind that Stripe Tax only covers sales transacted within Stripe. Merchants using additional sales channels will also need to configure setups for those payment gateways and marketplaces or get assistance from a third-party compliance partner.
What you need before you can collect tax with Stripe
In order to automate tax calculation, Stripe Tax needs accurate information about your business and how it operates. For the system to work, you’ll need to provide information about your organization, your tax obligations, and the service plan you want to use.
Before engaging with the onboarding workflow, take some time to gather all of the appropriate information you’ll need. If you don’t have the appropriate documentation on hand, you’ll be forced to pause the process shortly after you begin.
Create your Stripe account and Stripe Tax plan
You’ll need a Stripe account before you can access Stripe Tax. If you already use Stripe for payments or billing, you can add Stripe Tax from your existing Dashboard rather than creating a separate account.
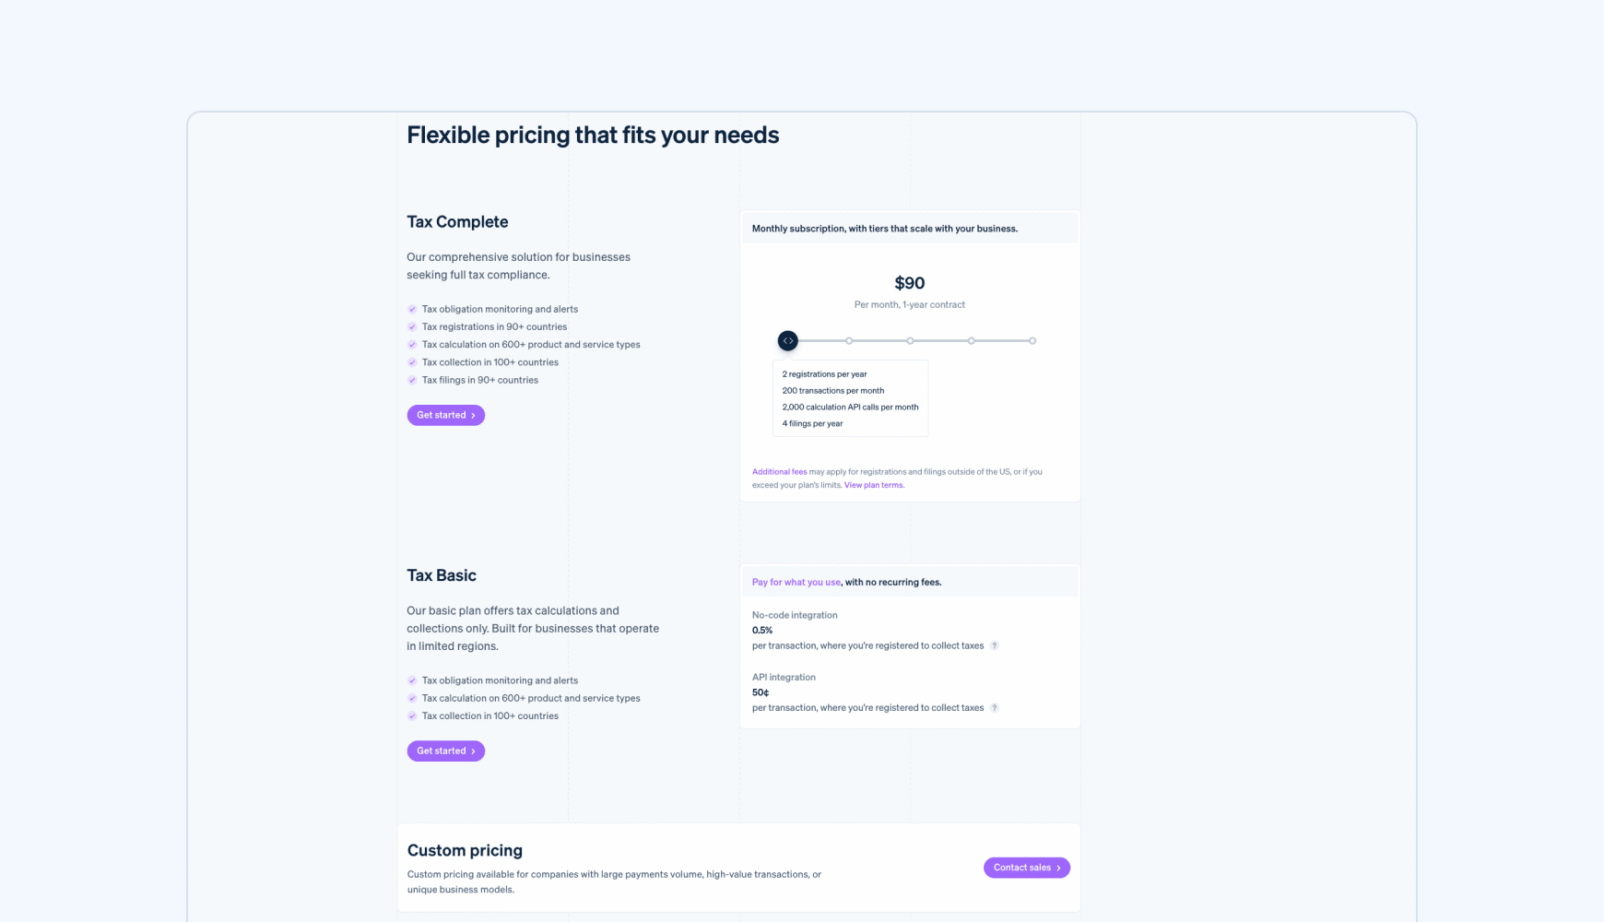
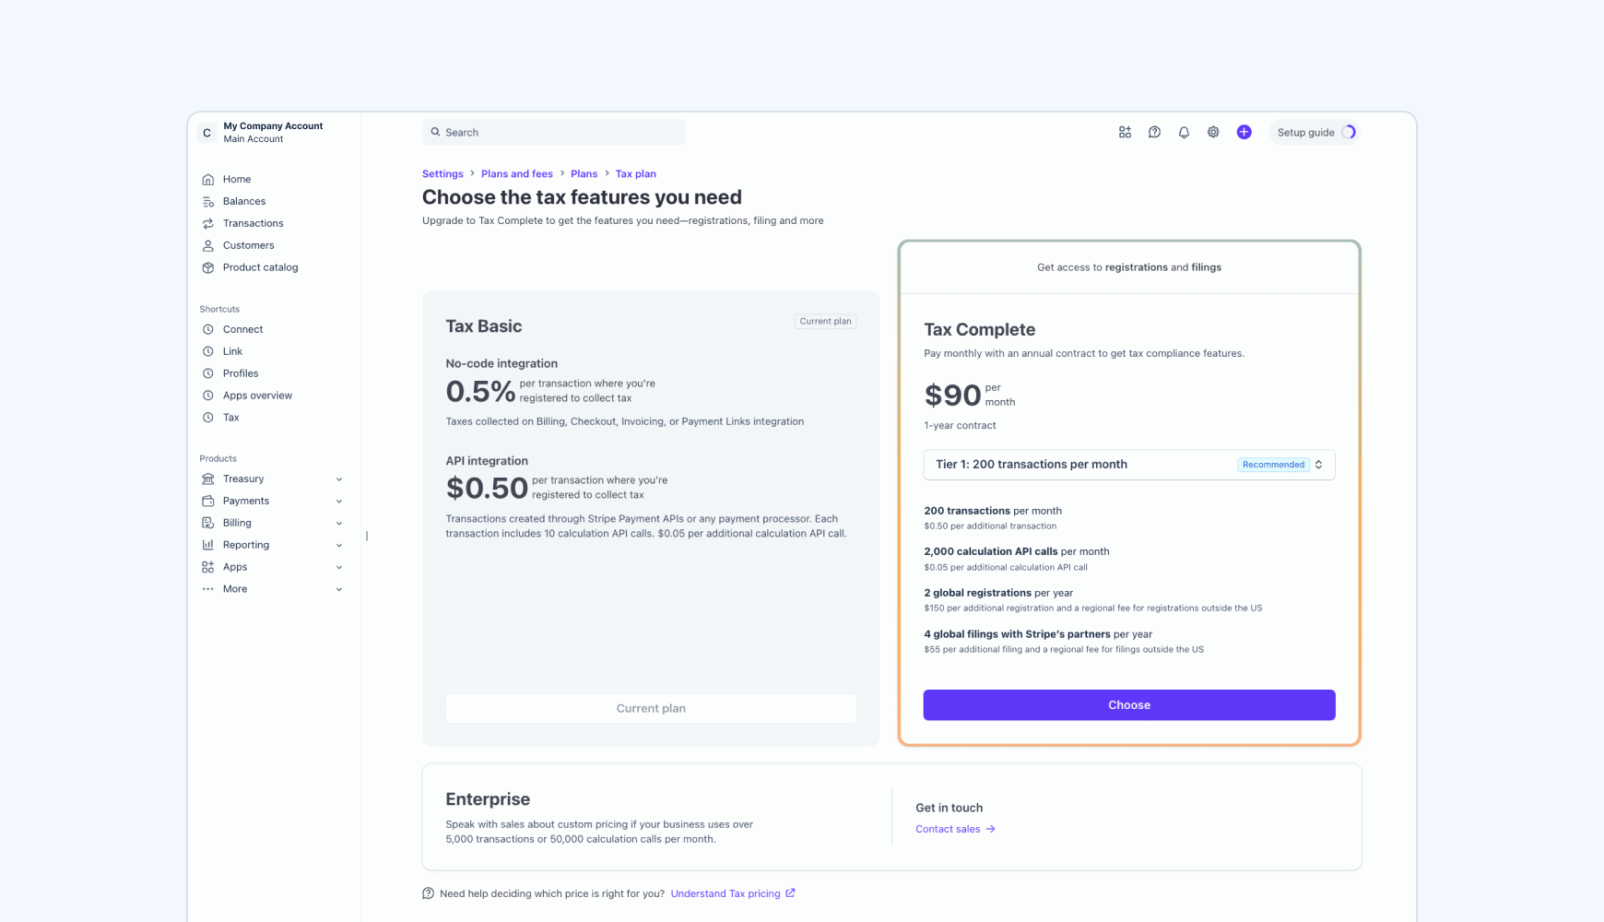
Stripe Tax currently offers two plans:
- Tax Basic is a pay-as-you-go plan focused on calculation and collection. While there is no monthly fee, this plan takes 0.5% for no-code transactions and $0.50 for API-based transactions.
- Tax Complete offers a flat monthly rate with an annual commitment, starting at $90/month. The plan also carries additional perks and limitations and offers some assistance for registrations and filings. [1]
Ultimately, the plan you choose should match how much of the compliance process you want to manage through Stripe.
Not sure which plan to choose? Read this article completely for a better understanding of what coverage Stripe offers and how to connect Stripe to other compliance partners.
Determine where you need to collect sales tax
Before you can configure Stripe Tax inside the platform, you need to determine where your business is required to collect taxes. These obligations are generally created through physical nexus, economic nexus, or a combination of the two.
How you identify your sales tax obligations will depend on where you’ve been processing transactions.
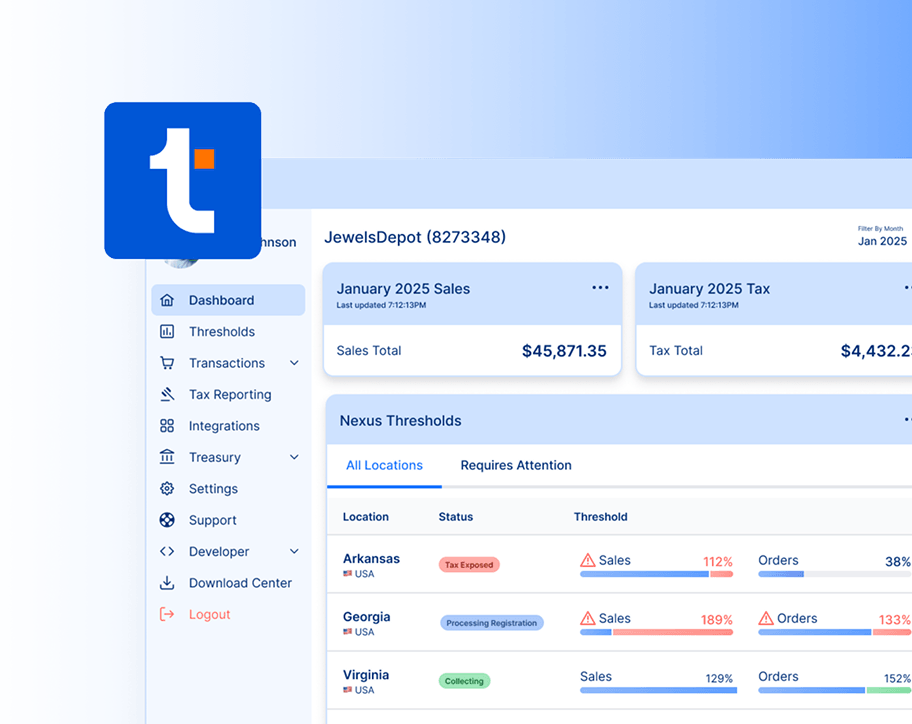
- If you already use Stripe, selecting a Stripe Tax plan will enable features that do this for you. Stripe Tax can review your transaction history and compare your sales in each jurisdiction against local economic nexus thresholds. The Thresholds dashboard can flag jurisdictions states where you may be approaching or have already exceeded the registration threshold, even if Stripe Tax wasn’t used to calculate tax on earlier transactions.
- If you process transactions outside of Stripe, you’ll need to account for those sales separately. Stripe Tax will allow you to import transaction data from third-party platforms via CSV, [2] creating a more complete view of your threshold activity inside the dashboard. Using this feature will require you to export transactions from other marketplaces in a CSV format and upload them to Stripe.
- If you’ve decided to use a third-party compliance partner like TaxCloud, you’ll need to import all transaction data — including any transaction data from previous Stripe transactions — to that platform via integration or CSV instead.
Once you have all transaction data in one place, you’ll be able to make clear determination about which states require registration. Automated tools like nexus trackers in Stripe and TaxCloud can flag potential obligations, but they can’t make a filing determination for you.
If you’re consolidating sales data manually, you’ll need to review state documentation and determine whether your annual sales or transaction amounts will exceed the minimum threshold required for registration.
Read more:
- How to register for sales tax in multiple states
- Economic nexus explained: How your nexus obligations change as you scale
Register with state authorities
Once you identify a state where you’re required to collect sales tax, you’ll need to register with that state’s tax authority. This gives your business permission to collect tax and establishes the filing obligations that begin after registration.
Stripe will ask where you’re registered during setup, so you’ll need to complete the appropriate registrations before you can begin collecting tax in those states.
To register, you can do any of the following:
- Apply directly with the state. Processes and fees vary.
- Work with a third-party partner. Costs vary by provider.
- Ask Stripe to register on your behalf. This requires the Tax Complete plan and is subject to eligibility requirements.
If you register independently, keep the registration information and effective date provided by the state. You’ll enter those details into Stripe so the platform knows where and when to begin tax collection. If Stripe handles the registration, it will add the completed registration to your Dashboard automatically.

Information checklist
Below, you’ll find a quick checklist of all the information you’re likely to need while setting up your Stripe Tax account.
- Head-office or origin address.
- State registrations and effective dates.
- Historical sales data from all channels.
- Product and service catalog.
- Product taxability decisions.
- Pricing model and currencies.
- Intended tax collection behavior.
- Customer address and exemption information.
- List of Stripe payment flows currently in use.
- Existing subscriptions, invoices, and Payment Links.
- Existing manual or legacy tax settings.
- Business identification and ownership details.
Note that some of this information may not be required, based on your existing setup. For example, you may not need to gather historical data from external sales channels if you’ve only ever used Stripe for payment processing.

Step 1: Enable Stripe Tax and confirm your head-office information.
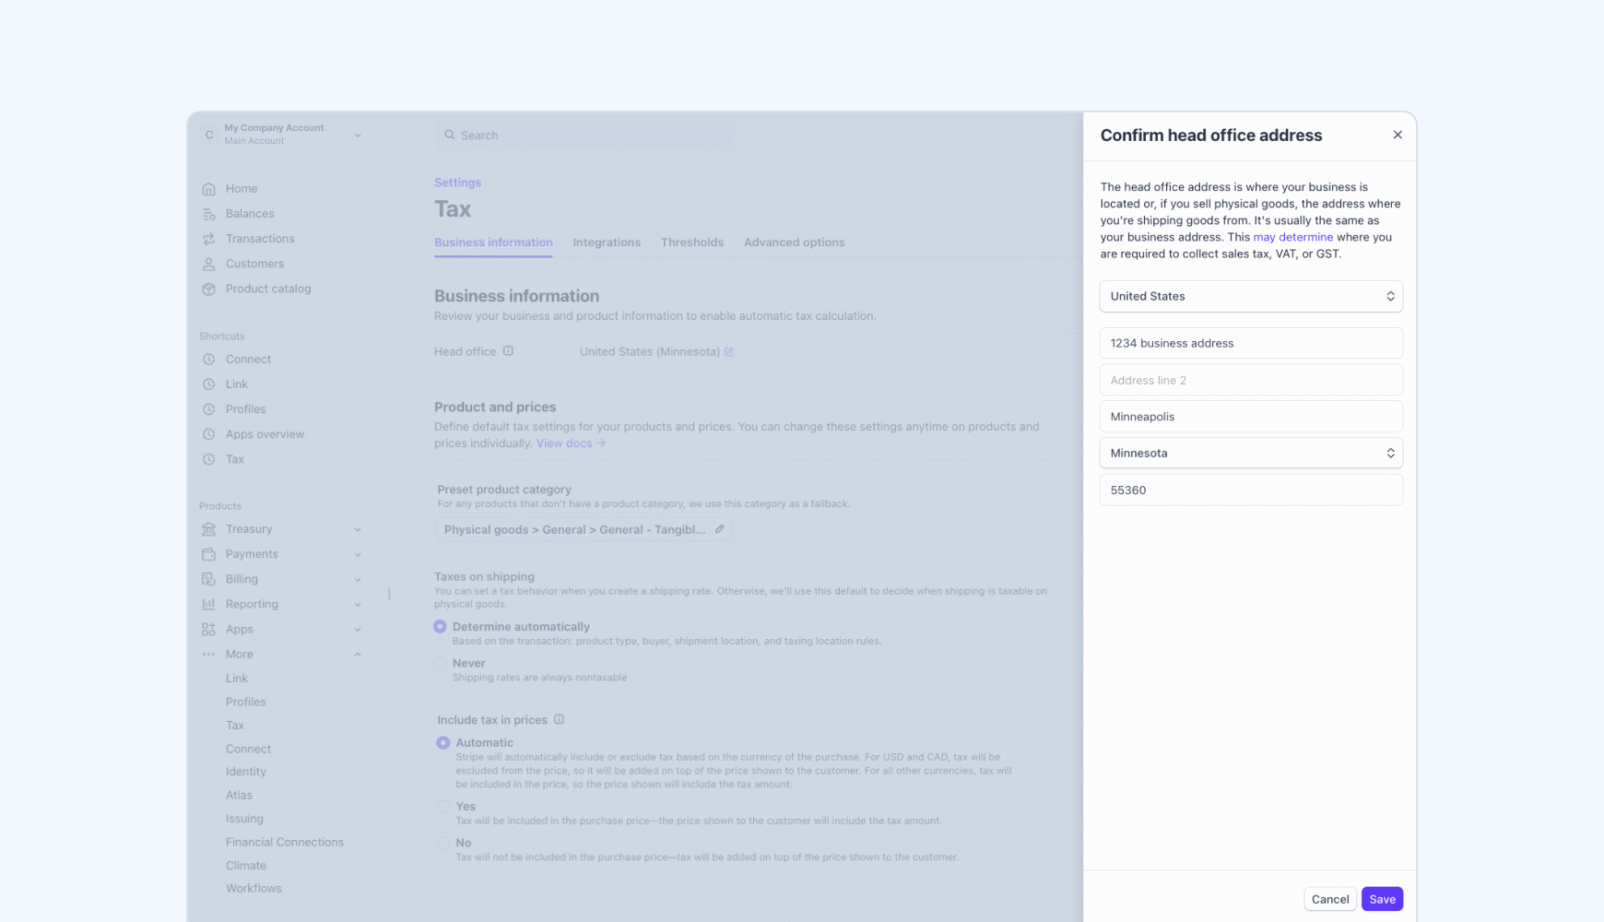
To begin, sign into your Stripe dashboard, open the Tax settings tab on the left sidebar, and click “Get Started.” This will trigger the onboarding workflow and start the process of enabling tax collection on your Stripe account.
By default, Stripe will use the business address already associated with your account as your head office address.
About head offices
Stripe defines a head office differently, depending on your business model.
- If you sell physical goods, Stripe defines your head office as the locations where the goods are shipped from.
- If you sell digital goods, Stripe defines your head office as the primary location of the business.
Your head office address is the default origin that Stripe uses when calculating tax, meaning that some portion of collected tax will be determined by this location. [3]
Be sure to review your information carefully before continuing and correct any outstanding errors so that tax is correctly applied.
Step 2: Add your sales tax registrations in Stripe
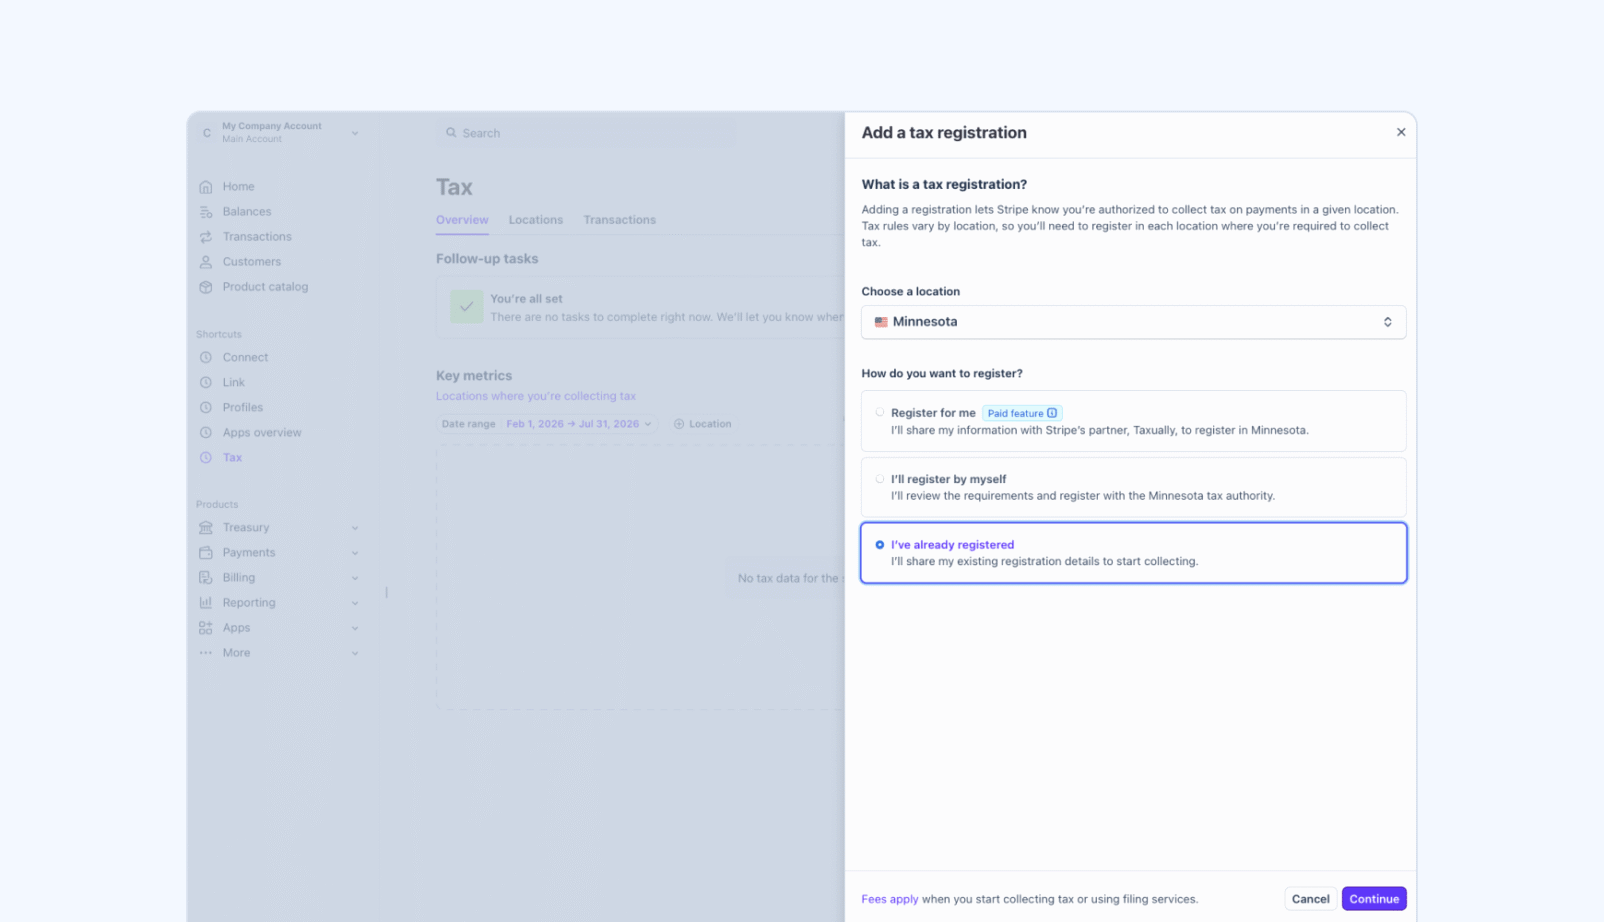
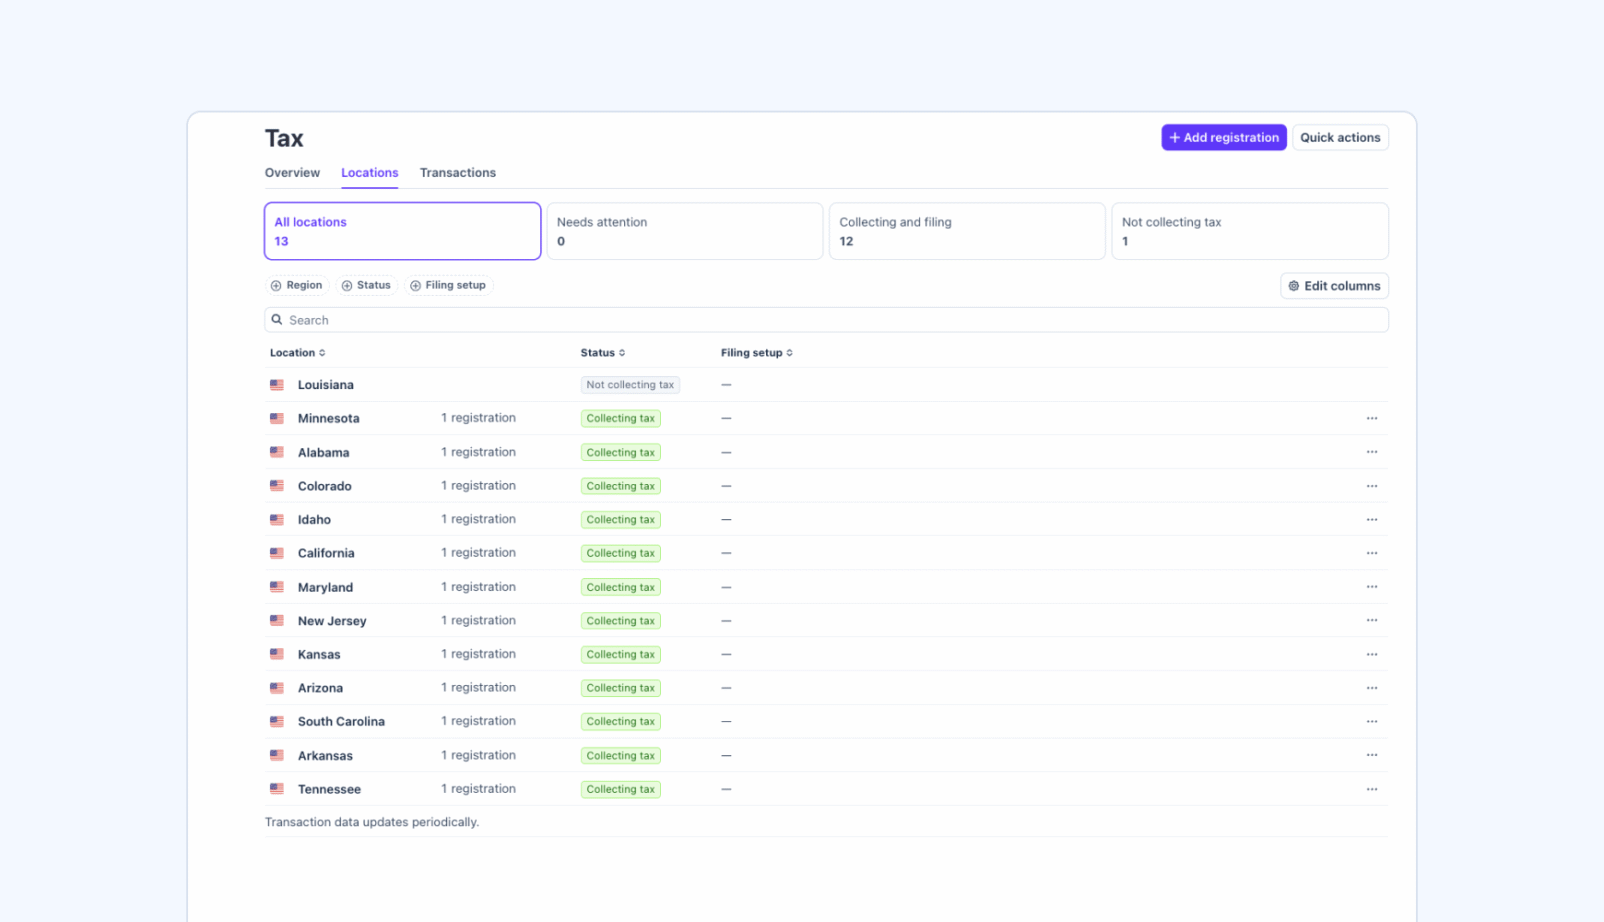
Next, you’ll need to tell Stripe where your business is authorized to collect sales tax. From the Tax section of your Dashboard, open Registrations > Add registration.
Select the appropriate state, choose “I’ve already registered,” and enter the information Stripe requests. Adding a registration to Stripe does not register your business with the state; [4] it tells the platform where you’re already authorized to collect.
For registrations that are already active, select “Start collecting tax immediately.” You can also schedule collection to begin on a future effective date. Repeat these steps for every state where you’ve registered.
Note: If Stripe completed registrations on your behalf via the Tax Complete plan, that registration should already be in your Dashboard.
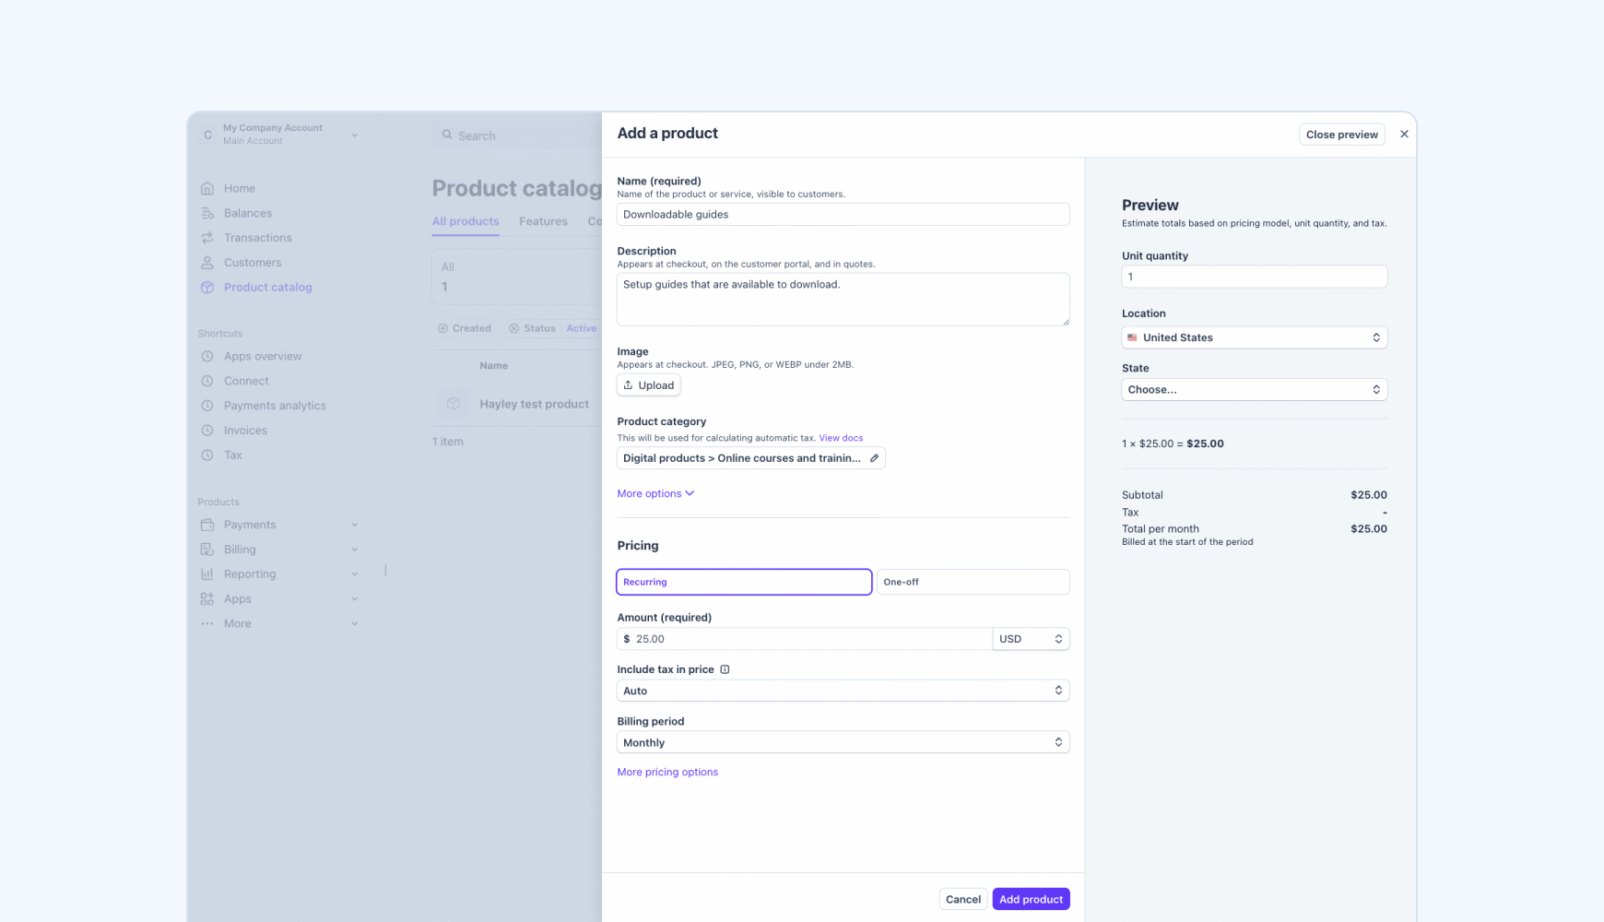
Step 3: Choose a preset product tax code
Stripe uses product tax codes to determine how the items you sell should be taxed.
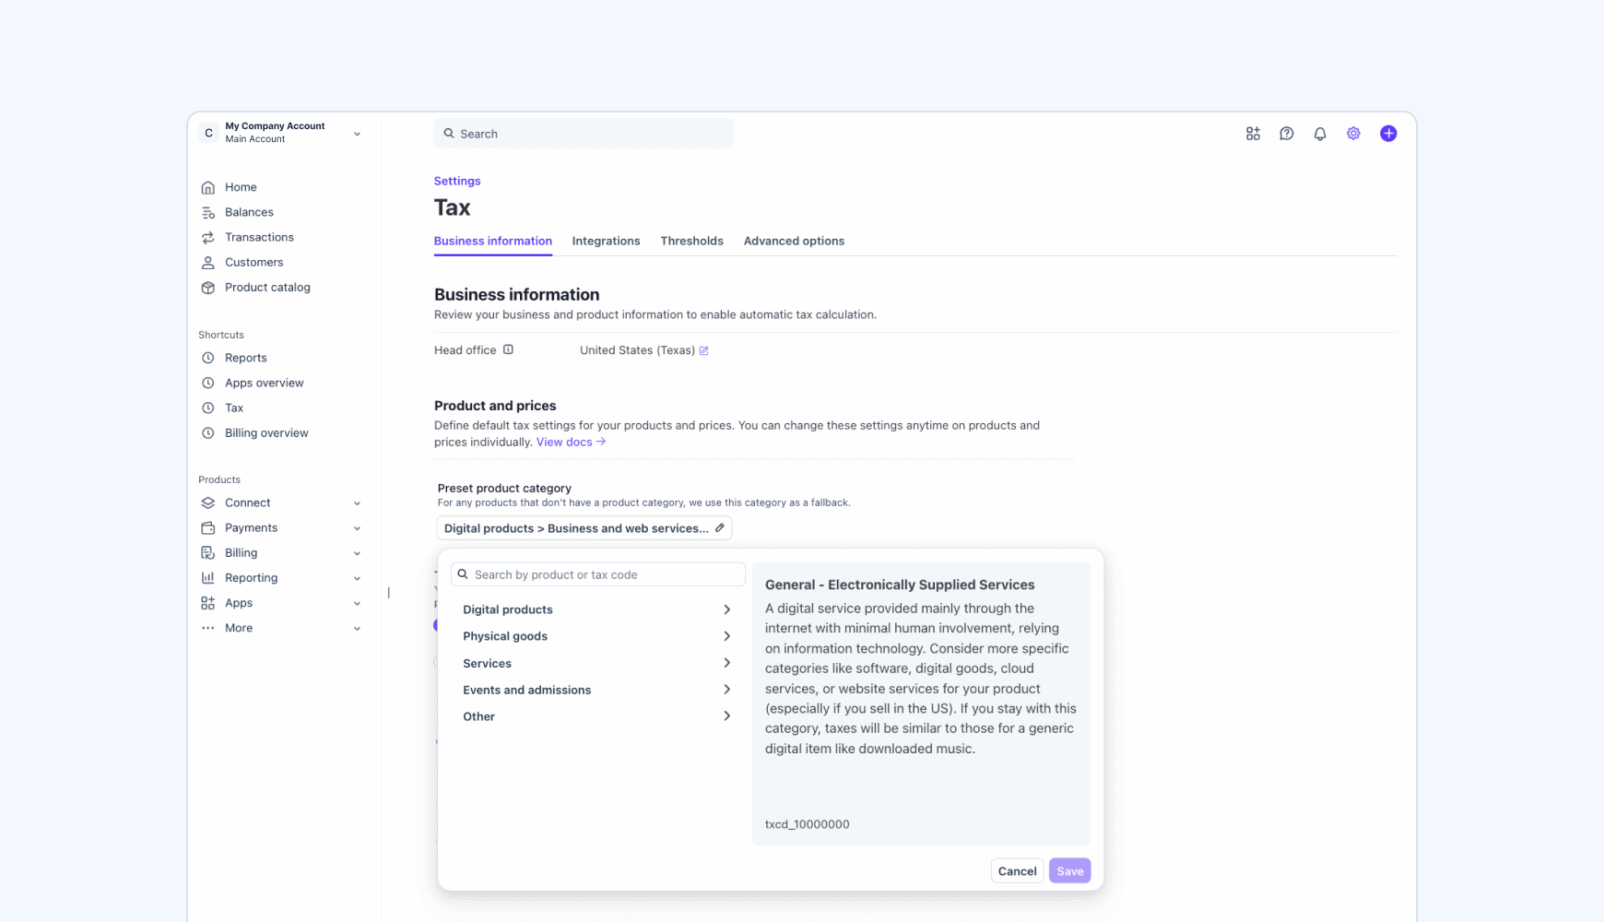
If you went through the automated setup workflow, you may have been asked to choose a preset code that represents your primary product or service. It’s worth taking the time to confirm that the correct default code is in place or add one, if you haven’t already.
Your default tax code primarily serves as a fallback. [5] Stripe will apply it to transactions or products that don’t have their own code. While you’ll be able to get more specific when assigning individual codes (next step), it’s best to set the default to a broad category so that it covers the majority of your product types.
Keep in mind that if you sell very specific or niche products in a category and a specific preset code would apply to most of what you sell, choosing a narrow code instead of a broader code may make more sense.
Step 4: Assign tax codes to individual products
Your preset code (assigned in Step 3) gives Stripe a default, but it might not accurately describe every item that you sell. After the preset code is established, take the time to review your product catalog and assign more specific codes wherever your tax treatment varies.
To update a product, open the Product catalog section of your Stripe Dashboard, select the item, and choose the appropriate option from the tax-code dropdown. Once the code is selected, Stripe will use it when the product appears in a support transaction.
Be sure to take extra care with products that can be classified differently, depending on their intended use case. For example, in its API documentation, Stripe actually recommends creating separate products when the same SaaS subscription offering — one for business and another for personal use — and assigning the appropriate code for each if the tax will be treated differently. [6]
Step 5: Configure tax behavior for your prices
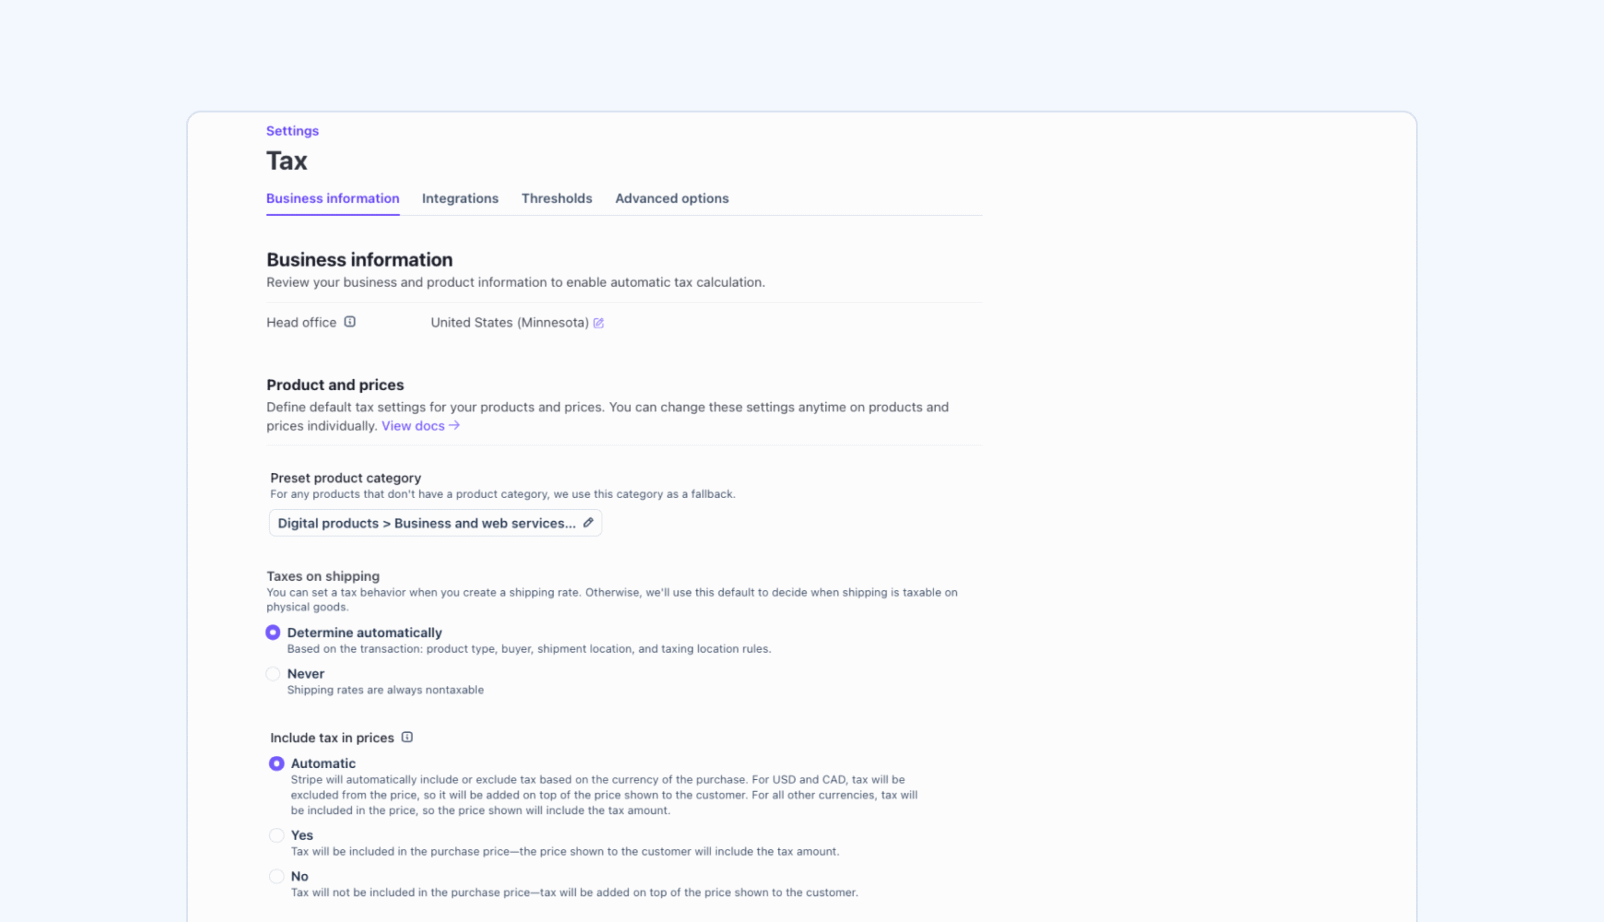
Tax behavior determines whether Stripe adds tax to a product’s listed price or treats the listed price as if it already includes tax. You can set a default under Tax settings > Include tax in prices, and this setting will apply whenever an individual price doesn’t have its own, individualized tax behavior.
Stripe provides three options for this setting:
- Exclusive. Stripe adds tax to the listed price, so the customer’s final price will increase at checkout.
- Inclusive. Tax is already included in the price, so the customer’s final price doesn’t increase at checkout.
- Automatic. Stripe uses the currency default. USD and CAD will be treated as exclusive while other currencies will be treated as inclusive.
For companies selling primarily in the U.S., exclusive pricing will match the way buyers expect tax to appear at checkout. You can override these defaults when creating an individual price, but you won’t be able to change the setting once a new price is set. Instead, you’ll have to create a new price and archive the old one instead (handled via API). [7]
Step 6: Make sure Stripe can determine customer locations
Stripe Tax determines which tax rules apply based partly on the customer’s location and will need those details. [8]
For U.S. transactions, Stripe can calculate using a postal code, but collecting the customer’s full address provides a more precise result.
Stripe Checkout and Payment Links collect the necessary address information as part of the transaction process. However, teams will need to review customer records for any invoices, subscriptions, and custom integrations and add any missing location data before automatic tax can be enabled.
For companies that were using Stripe before enabling tax collection, it’s important to pay attention to existing customer accounts. If address information wasn’t captured during checkout, Stripe can’t retroactively add it to those accounts. Missing or invalid address data will stop automatic tax calculation on things like subscriptions and invoices, leading to coverage gaps.
Step 7: Enable automatic tax in each Stripe payment flow
Enabling Stripe Tax at the account level doesn’t necessarily activate it across every way that you accept payments. You’ll need to review each payment flow and confirm that automatic tax has been enabled wherever customers typically complete a purchase.
- Stripe Checkout. Confirm that automatic tax is enabled for purchases and subscriptions completed through checkout. [9]
- Stripe Invoicing. Turn on automatic tax so that Stripe calculates the amount due when an invoice is finalized. [10]
- Stripe Billing and subscriptions. Enable automatic tax for subscriptions so that it applies to recurring payments. [11]
- Stripe Payment Links. Turn on automatic tax for every Payment Link that should collect tax. [12]
Important: Existing subscriptions, invoices, and Payment Links may not inherit the new tax settings automatically. We’ll address those items in the next section, but don’t forget to update legacy customer data (Step 6) so that Stripe Tax has all the information it needs to calculate taxes properly.
Step 8: Update all existing subscriptions, invoices, and payment links
Automatic tax applies to new payment flows going forward, but Stripe doesn’t automatically add it to items that already exist. Before launching, review any active subscriptions, invoices, and Payment Links. Enable automatic tax where needed.
For subscriptions, Stripe provides a filter that identifies accounts where automatic tax is disabled. Existing invoices will need to be edited and updated individually. [13] Any old rates that were manually added to subscriptions should also be removed to avoid conflict with automated calculations.
Step 9. Test Stripe Tax before going live
Even if you have an existing account, it’s possible to use Stripe’s testing sandbox to confirm that your setup calculates tax as expected. [14] Tax settings are configured separately in each sandbox, so you can add a test registration and make sure that automatic tax is enabled for the payment flow you want to test.
To enable the sandbox, click on the Sandboxes tab in the Dashboard account picker. [15]
If you haven’t used this feature before, you may need to create a sandbox, but doing so is limited to specific roles. [16]
To test: Run several transactions using different customer locations and product types. Include an address in a state where you added the registration — as well as one where you haven’t — and confirm that tax appears (or doesn’t) as intended.
After each transaction, review the automatic tax calculations in the Dashboard. Stripe will show the tax collected or explain why the transaction produced a zero-tax result.
When you’re ready and Stripe Tax has been fully tested, enable live collection on your account.
Step 10. Review Stripe Tax reporting and threshold monitoring
After your first live transactions are complete, hop into the Tax section of your Dashboard and confirm that Stripe is recording sales and collected tax correctly. From the Registrations tab, you’ll be able to review reports by location or export transaction data for a selected period.
You should also revisit the Thresholds dashboard on a regular basis. Stripe tracks your sales against economic nexus rules and will flag locations where you should register and begin collecting sales tax. [17]
Remember, if you sell through other platforms, make sure those transactions are imported or monitored elsewhere so your threshold review reflects your full sales footprint.
Common mistakes to avoid
While we’ve covered the major steps in the setup process, it’s also worth talking quickly about common mistakes that can happen during configuration.
Most issues with Stripe Tax come from an incomplete setup rather than a problem with the calculation engine itself. Before going live, review your account for these common mistakes.
- Enabling Stripe Tax before registration is active. Adding a state to Stripe doesn’t authorize you to collect there. Follow the recommended steps, complete the registration step first, or schedule collection to begin on the date provided when you register. [18]
- Relying too heavily on a preset tax code. Preset codes are implemented as fallbacks in the event that Stripe Tax can’t use the primary code. Products with different tax treatment should receive their own codes. [19]
- Overlooking shipping tax. Stripe maintains a separate preset code for shipping charges. If you leave shipping unclassified or mark it as nontaxable without reviewing associated rules, you may end up paying those costs. [20]
- Confusing product tax codes [21] with price tax behavior. [22] Product tax codes help Stripe Tax determine whether and how an item should be taxed. Tax behavior controls whether that tax is added to the price at checkout or included in the standard price.
- Using incomplete customer information. Missing or invalid location data can prevent tax calculations. In some recurring billing situations, Stripe may finalize an invoice without tax and disable automatic tax for the affected subscription. [23]
- Assuming that existing payment flows were updated. Enabling Stripe Tax does not automatically change any existing subscriptions, invoices, or Payment Links. You’ll need to review each configuration separately and update it as necessary to comply with your new setup. [24]
- Testing only one state or configuration. The sandbox tool can be used to test how Stripe Tax calculates tax in a variety of scenarios. Use it to test different customer locations, products, registrations, no-tax scenarios, and more before going live. [25]
- Treating Stripe activity as your entire tax footprint when it isn’t. Sales processed through other platforms will impact your nexus and filing obligations. Make sure those transactions are accounted for elsewhere, that tax is properly calculated via other channels or compliance partners, and that the data is imported to Stripe if you’re using Stripe’s nexus tools to track your compliance obligations.
Also, keep in mind that sales tax is a live and evolving challenge. As your business grows, expands, begins offering new products, or brings on new employees, your tax obligations are likely to change.
While Stripe Tax might not need daily tweaks, you should review your setup regularly and update it where appropriate to stay in compliance with state and federal authorities.
What you’ll need to handle post-setup
Even though Stripe Tax can help you handle tax calculation and collection on the Stripe platform, you’ll need an ongoing process to manage the obligations created by those transactions.
Some of this work can be handled through Stripe, but other responsibilities are out of scope for Stripe Tax and are handled externally by third party compliance solutions. The Tax Complete plan gives some options for this, but you may also choose to work with a compliance solution of your choice.
Registrations
Your registration requirements are likely to change as your business enters new states or crosses additional economic nexus thresholds. Stripe can alert you to potential obligations, but you’ll still need to review the results and initiate the registration process when required to do so.
Tax Complete customers can ask Stripe to complete registrations. [26]
A registration allotment is included with the annual plan, but additional registrations will incur a fee. It’s also possible to register directly with the state, or to work with another compliance partner.
Regardless of how you choose to do it, make sure the registration is active in Stripe before you begin to collect tax from that location.
Filing and remittance
Collecting tax creates an obligation to file returns according to the schedule assigned by each state. Depending on the jurisdiction and your volume, returns may be due monthly, quarterly, or annually. However, monthly filing thresholds are low in many states.
Stripe Tax doesn’t handle filing or remittance internally and instead outsources this to third-party filing partners. Tax Complete customers can use their filing credits to file with TaxJar or Taxually, which use Stripe data to prepare returns and support remittance. It’s also possible to work with other compliance partners, like TaxCloud, to take advantage of lower-cost filing services.
Multichannel sales data
Stripe Tax only collects tax on transactions processed through the Stripe platform. If you’re selling through other ecommerce platforms and marketplaces, those sales need to be included when tracking nexus and preparing returns.
If you’re using Stripe’s nexus tracking tools, it’s possible to upload a CSV file to gain a more holistic view of your tax obligations. However, keep in mind that Stripe doesn’t collect taxes on those transactions.
Companies that want all channels synchronized automatically can also work with a compliance partner that connects to all platforms (including Stripe) and consolidates all transaction data into a single filing workflow.
Exemption certificates and audit documentation
Within Stripe, it’s possible to identify a customer as a tax-exempt entity, but the platform doesn’t offer a way to collect and store exemption certificates. Your business will remain responsible for collecting the appropriate certificates and maintaining records that demonstrate why tax wasn’t charged.
Stripe Tax users can work with a paid, third-party service for this, but compliance partners may also have certificate management tools to close this gap.
Managing sales tax with Stripe
Depending on your setup, Stripe Tax may be all your business needs, or you may need to include it as part of a larger compliance ecosystem.
The right approach will depend on the size and complexity of your tax footprint, including the size of your business and the sales channels you use.
This section gives a brief overview of when Stripe Tax might be enough or when you may need to consider support from additional partners and resources.
When Stripe Tax may be enough on its own
- Most transactions remain inside Stripe. When Stripe contains nearly all your sales activity, its threshold monitoring and reporting tools can provide a relatively complete view of your economic nexus exposure.
- You operate in relatively few states. A smaller filing footprint is much easier to manage manually. If you’re operating in a smaller number of states, the registration and filing allowances within Tax Complete may provide enough support.
- Your products have straightforward taxability. Companies with a constant catalog are less likely to need extensive product taxability research or manual classification support.
- Someone in-house owns the remaining compliance work. Even though Stripe can automate a significant amount of the compliance process, someone on the team will need to review alerts, confirm obligations, and make sure those obligations are handled.
When you’ll need a dedicated compliance partner
- Sales come through multiple channels. Even though Stripe supports CSV imports, it’s a manual process. Companies with several active platforms will be better off using automated integrations and connections to import transaction data for nexus monitoring.
- Your state footprint is growing. Additional registrations create additional filing schedules, reconciliation work, and opportunities for missed deadlines. Combined with handling multiple sales channels, it becomes much easier for companies to hit the ceiling of what Stripe Tax can handle by itself.
- Taxability is becoming more complicated. Some business models are more complicated than others. SaaS companies in particular face different rules from state to state, especially as new products and customer types (business or personal) are introduced. As things get more complicated, a dedicated compliance partner can offer solutions to solve for those issues.
- You need support beyond routine filing. Historical exposure, state notices, exemption certificate management, audit support, and similar solutions are likely to require a much broader compliance relationship or a separate relationship with CPAs and accountants.
- You may qualify for SST benefits. An SST Certified Service Provider like TaxCloud can help eligible businesses reduce registration and filing costs in up to 24 participating states. This is something that Stripe Tax can’t provide, and it’s a great way to save money on compliance costs.
How TaxCloud works with Stripe
Unlike many alternative solutions, TaxCloud works with Stripe Tax rather than trying to replace it. Stripe continues to handle payment processing and real-time tax calculation while TaxCloud uses the resulting transaction data to support a broader compliance process.
Here’s a closer look at how TaxCloud and Stripe work together to handle compliance.
Stripe calculates while TaxCloud handles compliance
After connecting TaxCloud to Stripe, you’ll be able to continue using Stripe as you do today. Stripe Tax continues to calculate and collect tax on supported transactions and collects that data as normal. You’ll also maintain a separate plan with Stripe Tax, meaning that you’ll pay for calculation usage within the Stripe platform at a scale that best suits your needs.
Meanwhile, TaxCloud’s own calculation engine and integrations can be deployed to handle transactions from other sales channels. This allows companies to sell on Stripe while TaxCloud provides support for marketplaces and channels outside of the Stripe ecosystem.
Consolidating Stripe and non-Stripe transaction
Because Stripe and TaxCloud are integrated, all sales data from Stripe flows into the TaxCloud ecosystem. TaxCloud also adds data from other connected platforms and combines everything to create a more complete view of your transaction and compliance obligations.
Because all data flows into TaxCloud’s own nexus tracking tools automatically, teams can get real-time updates on nexus obligations without needing to conduct manual import/export processes with CSVs.
What transaction data TaxCloud collects from Stripe
- Invoices.
- Credit notes.
- Checkout Sessions.
- Returns and adjustments.
- Product tax-code mappings and overrides.
- Choice of capturing orders when created or paid.
Quick note: Currently, TaxCloud’s Stripe integration doesn’t support standalone charges or transactions handled via the Payment Intents API.
Reducing file costs through SST
Eligible businesses can also use TaxCloud’s participation in the Streamlined Sales Tax program to reduce compliance costs. This program is freely available to all TaxCloud customers and has some important benefits.
When using the SST program:
- A one-time registration covers all 24 member states.
- Registration is free for remote sellers.
- Filing and remittance are centralized and carry no cost.
- TaxCloud can provide free audit support.
The ability to file for free in up to 24 states can result in massive savings for any mid-sized business. However, SST participation requires working with a registered provider.
How to connect Stripe and TaxCloud
To get started, confirm that Stripe Tax is enabled and review the product tax codes in your Stripe catalog. You can then connect from your TaxCloud account or install the integration through the Stripe App Marketplace.
During setup, review the automatic product mappings, make any necessary overrides, and choose whether TaxCloud should capture orders when they’re created or after they are paid.
Full setup instructions can be found here. You can also talk directly to our support team if you’re running into configuration issues.
Close the loop on tax compliance with Stripe and TaxCloud
Getting set up on Stripe Tax can change the way your business handles tax compliance, but the platform may not be enough by itself. TaxCloud can add the compliance support that growing businesses need to expand across more states and sales channels.
By connecting Stripe and TaxCloud, you can reduce manual reconciliation, maintain a clearer view of your obligations, and manage filings without rebuilding your existing payment workflow. Plus, because everything is handled in one place, you’ll have a single source of truth when addressing any compliance issues.
Want to learn more?
Talk to our product experts about your current set up, and get a live demo to see exactly how Stripe Tax and TaxCloud can work together to streamline your compliance process.
Set up tax in Stripe — FAQs
Open the Tax section of your Stripe Dashboard and select Get started. The setup wizard will walk you through the basic steps, such as confirming your business information, adding the jurisdictions where you’re registered to collect tax, and configuring your product and pricing settings.
From there, you’ll be able to make specific adjustments and changes from the left sidebar.
You’ll also need to make sure automatic tax is enabled for each payment flow you use. If you have been processing transactions with Stripe already, keep in mind that activating Stripe Tax doesn’t update existing subscriptions, invoices, or Payment Links.
Yes. You’ll need an active sales tax registration before collecting tax from customers in a specific state or jurisdiction.
Adding a registration to your Stripe Dashboard also doesn’t automatically register your business with that state. You’ll need to apply independently or use Stripe’s own registration service (available via the Tax Complete plan), or work with another compliance provider.
Stripe can return a zero tax calculation for a few reasons.
- If you aren’t registered in the customer’s specific jurisdiction.
- The product is classified as nontaxable or exempt.
- The customer qualifies for an exemption.
- Location, transaction, or product data is incorrect.
You can review a transaction’s taxability reason inside the Stripe dashboard to identify why tax wasn’t charged, but the steps to fix it will vary based on where the error has occurred.
Choose the product code that most accurately describes what the customer is buying. Your preset code should represent the majority of your catalog, but products with different tax treatment should receive individual codes.
If no classification fits, Stripe offers broader, generalized tax codes that might be more appropriate.
This largely depends on the region and how you want taxes to be handled in your pricing.
Tax-exclusive pricing is common in the U.S. and Canada, where taxes are added to the price at checkout. In the rest of the world, tax-inclusive pricing is expected, and the product price doesn’t change on the checkout screen.
If you want to conform to expectations more easily, Stripe offers an automatic setting that determines behavior based on transaction currency.
No. Stripe Tax is designed as a tax calculation engine and doesn’t handle filing and remittance.
However, customers on the Tax Complete plan can use filing credits with Stripe’s filing partners, TaxJar and Taxually. In this scenario, your Stripe Tax data flows to the third party partner, who handles filing and compliance on your behalf.
Alternatively, you can hand that data to third-party compliance partners, but they’ll require separate plans and do not accept the Tax Complete filing credits.
Not automatically. Stripe’s monitoring primarily uses transactions processed through Stripe.
You can add eligible external transaction data through Stripe’s CSV import tools, but businesses with several ecommerce and marketplace channels may prefer a compliance platform that connects and consolidates those sources automatically.
Yes. In this setup, Stripe Tax remains responsible for real-time calculation while TaxCloud imports the resulting transaction data for nexus tracking, reporting, and filing.
Combining Stripe Tax and TaxCloud offers a way for companies to continue using Stripe while allowing TaxCloud to support other marketplaces and platforms with its own tax engine and govern the entire compliance process.
Sources:
- 1.
- 2.
- 3.
- 4.
- 5.
- 6.
- 7.
- 8.
- 9.
- 10.
- 11.
- 12.
- 13.
- 14.
- 15.
- 16.
- 17.
- 18.
- 19.
- 20.
- 21.
- 22.
- 23.
- 24.
- 25.
- 26.
- 27.
- 28.
- 29.
- 30.