WooCommerce sales tax setup guide (2026)
Written by

Head of Product Marketing, TaxCloud

Principal Product Manager, TaxCloud

Updated
Key takeaways for WooCommerce sellers
- WooCommerce’s native settings can calculate and collect sales tax at checkout for states you manually configure, and WooCommerce Tax automates tax rate calculation — but neither tracks nexus, files returns, or remits to states on your behalf.
- For sellers in one or two states, these free tools are sufficient. For multi-state or multi-channel sellers, calculation at checkout is where compliance starts — not where it ends.
- Third-party sales tax compliance plugins like TaxCloud’s WooCommerce integration can handle the full compliance workflow — nexus tracking, registration, filing, and remittance — including free filing in 24 states through the SST program.
WooCommerce handles sales tax collection at checkout. What it does not handle — nexus tracking, state registration, filing, and remittance — is where most growing sellers run into problems.
Prefer to watch? We put together a video walkthrough that covers everything in this guide: how to configure WooCommerce’s native tax settings, when to add WooCommerce Tax, and what to do when you outgrow both. If you’d rather see it in action than read through the steps, start here.
This guide covers how to configure WooCommerce’s native tax settings correctly, when to add WooCommerce Tax, and what to do when you outgrow both. For growing businesses using WooCommerce as their primary ecommerce platform, TaxCloud is the compliance partner built for exactly that point — handling everything WooCommerce stops short of, without the cost or complexity of enterprise alternatives.
| What it does | Best for | |
|---|---|---|
| WooCommerce built-in settings (manual) | Manual rate entry, collection at checkout | Sellers in 1–2 states with simple product catalogs |
| WooCommerce Tax (free plugin, automated) | Automatically calculates live, street-level tax rates at checkout for any state you've registered in. Does not monitor nexus thresholds, manage exemption certificates, or file returns | Sellers who want accurate automated rates without maintaining manual CSV files |
| Third-party plugin (TaxCloud, TaxJar, Avalara) | Real-time calculation across all states, nexus tracking, registration, filing, remittance | Multi-state or multi-channel sellers who need full compliance automation |
| CPA or accounting firm | Full-service compliance management | Businesses with complex, irregular, or high-risk compliance obligations |
How to set up sales tax calculation and collection in WooCommerce
Before you can collect sales tax in WooCommerce you need to enable tax in your store settings first. You’ll need to complete this setup regardless of whether you plan to stick with WooCommerce’s built-in tax settings, or use the WooCommerce Tax plugin (see instructions below).
Step 1: Enable sales tax in WooCommerce settings
Before WooCommerce can calculate or collect sales tax, you need to turn the feature on. It’s disabled by default.
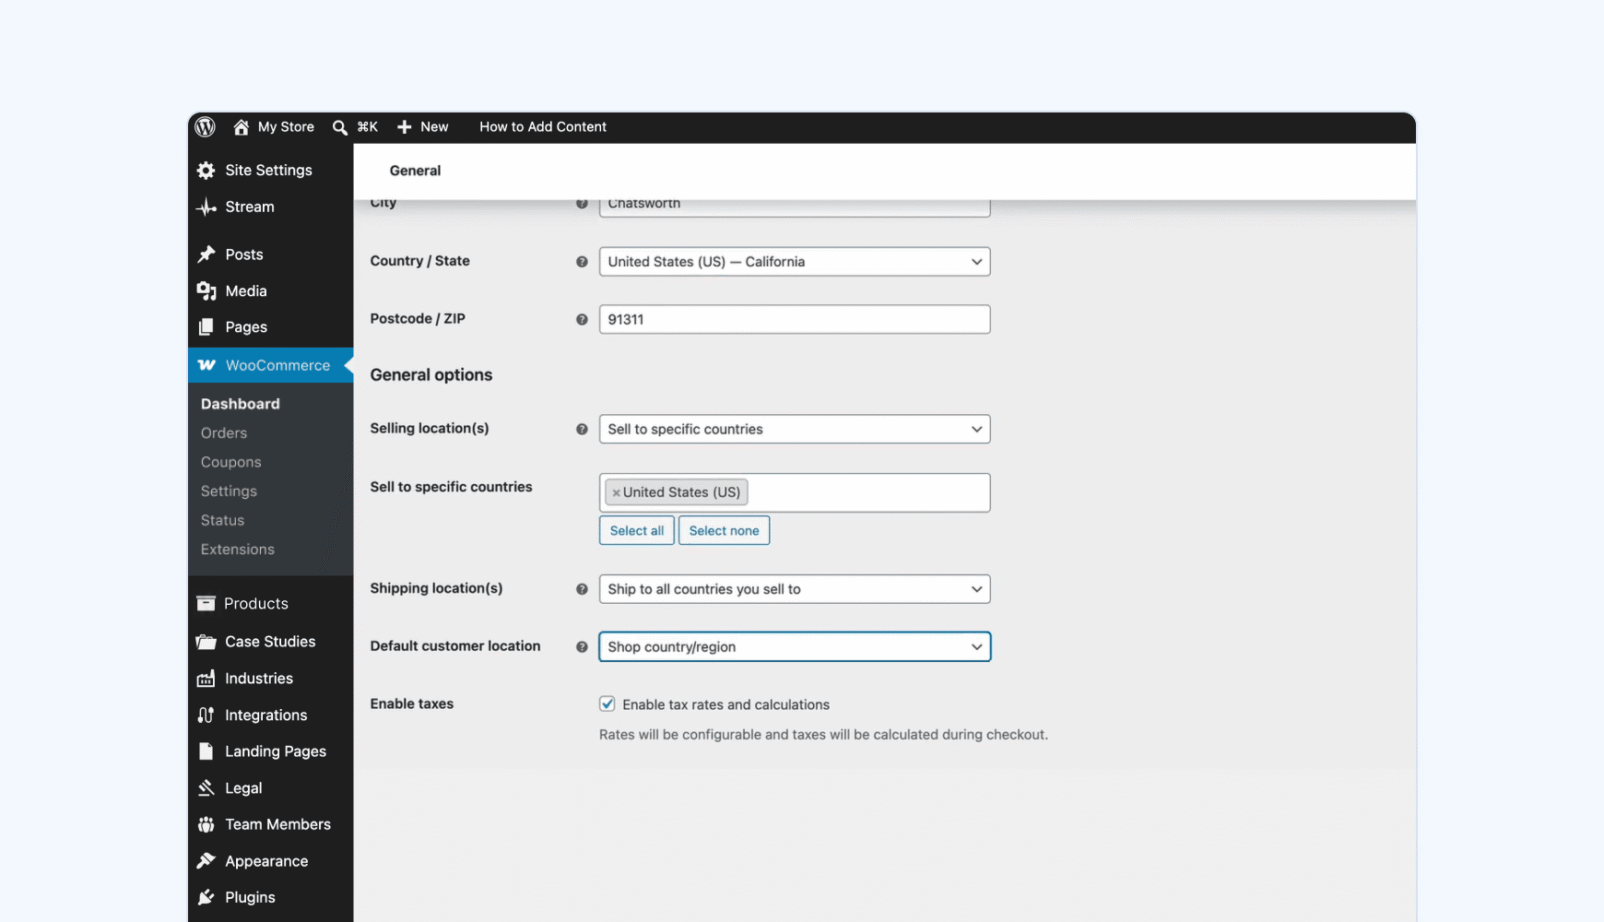
- Navigate to WooCommerce → Settings → General.
- Scroll down to General options and check the Enable tax rates and calculations box.
- Scroll to the bottom of the page and click Save changes.
Once enabled, a new Tax tab will appear in your WooCommerce settings. That’s where the rest of the setup happens.
Step 2: Configure tax options
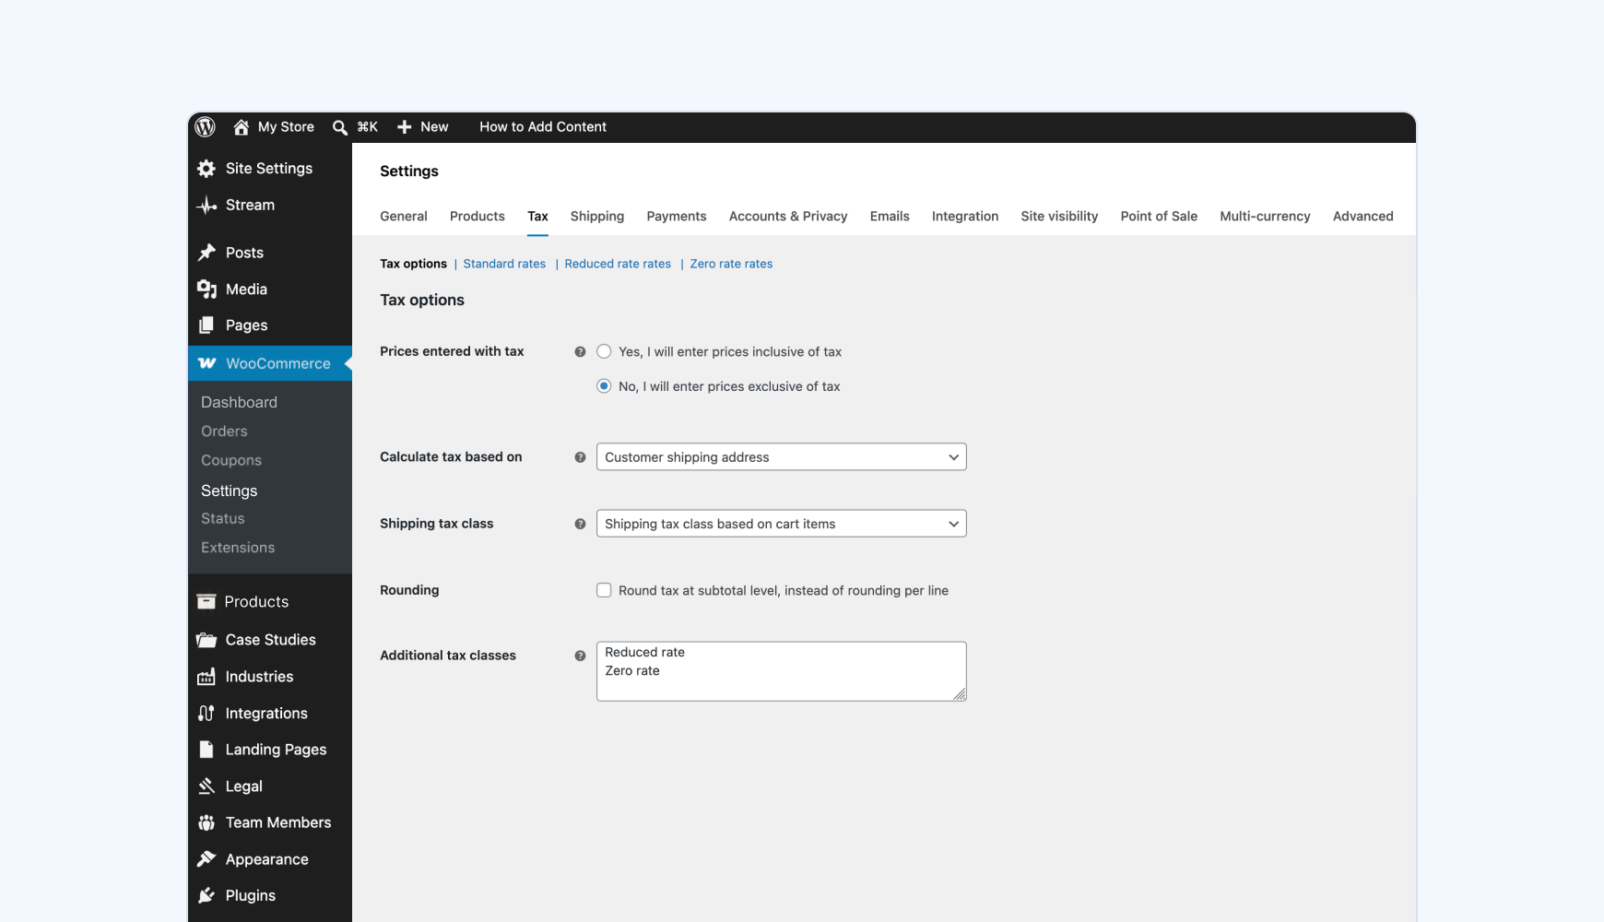
This is where you tell WooCommerce how to calculate, display, and apply tax across your store. Navigate to WooCommerce → Settings → Tax to access these settings.
Here’s what these settings do and how to configure them.
- Automated taxes: If you plan to use the WooCommerce Tax plugin, leave this enabled. If you’re entering rates manually, select Disable automated taxes.
- Prices entered with tax: You can enter prices for products in WooCommerce inclusive of tax or exclusive of tax. Most store owners should select No, I will enter prices exclusive of tax since this keeps your base price for each item consistent regardless of variations in state tax rates.
- Calculate tax based on: Most states require you to charge tax based on the customer’s shipping address. Select Customer shipping address unless you have a specific reason to do otherwise.
- Shipping tax class: Select Shipping tax class based on cart items. This applies the same rate to shipping as to the products being shipped.
- Rounding: This gives you the option to round your taxes to the nearest cent at the cart subtotal level rather than the per-item level. Leave this box unchecked.
- Additional tax classes: WooCommerce includes Standard rates, Reduced Rate, and Zero Rate by default. Leave unchecked for now. You’ll configure these in the next step.
- Display prices in the shop: You can decide whether the prices customers see include or exclude tax. Most US businesses should select Excluding tax since American shoppers typically expect tax to be added during checkout. If you’re selling internationally and need to charge VAT, customers may expect the price they see to include tax.
- Display prices during cart and checkout: This controls whether the item prices customers see in their cart and during checkout include or exclude tax. Select the same configuration you choose for the Display prices in the shop setting.
- Price display suffix: This allows you to add custom text after your item prices. Most shop owners should leave this blank.
- Display tax totals: You can choose whether to display tax charges during checkout on an item-by-item basis or for a customer’s entire cart. If most or all of your items are taxed at the same rate, select As a single total.
After choosing your settings, click Save changes at the bottom of the page.
Step 3: Set your standard tax rates
Setting your tax rates tells WooCommerce how much tax to collect in each state where you have nexus. Note that WooCommerce won’t update these rates automatically. It’s your responsibility to keep them current when state or local rates change.
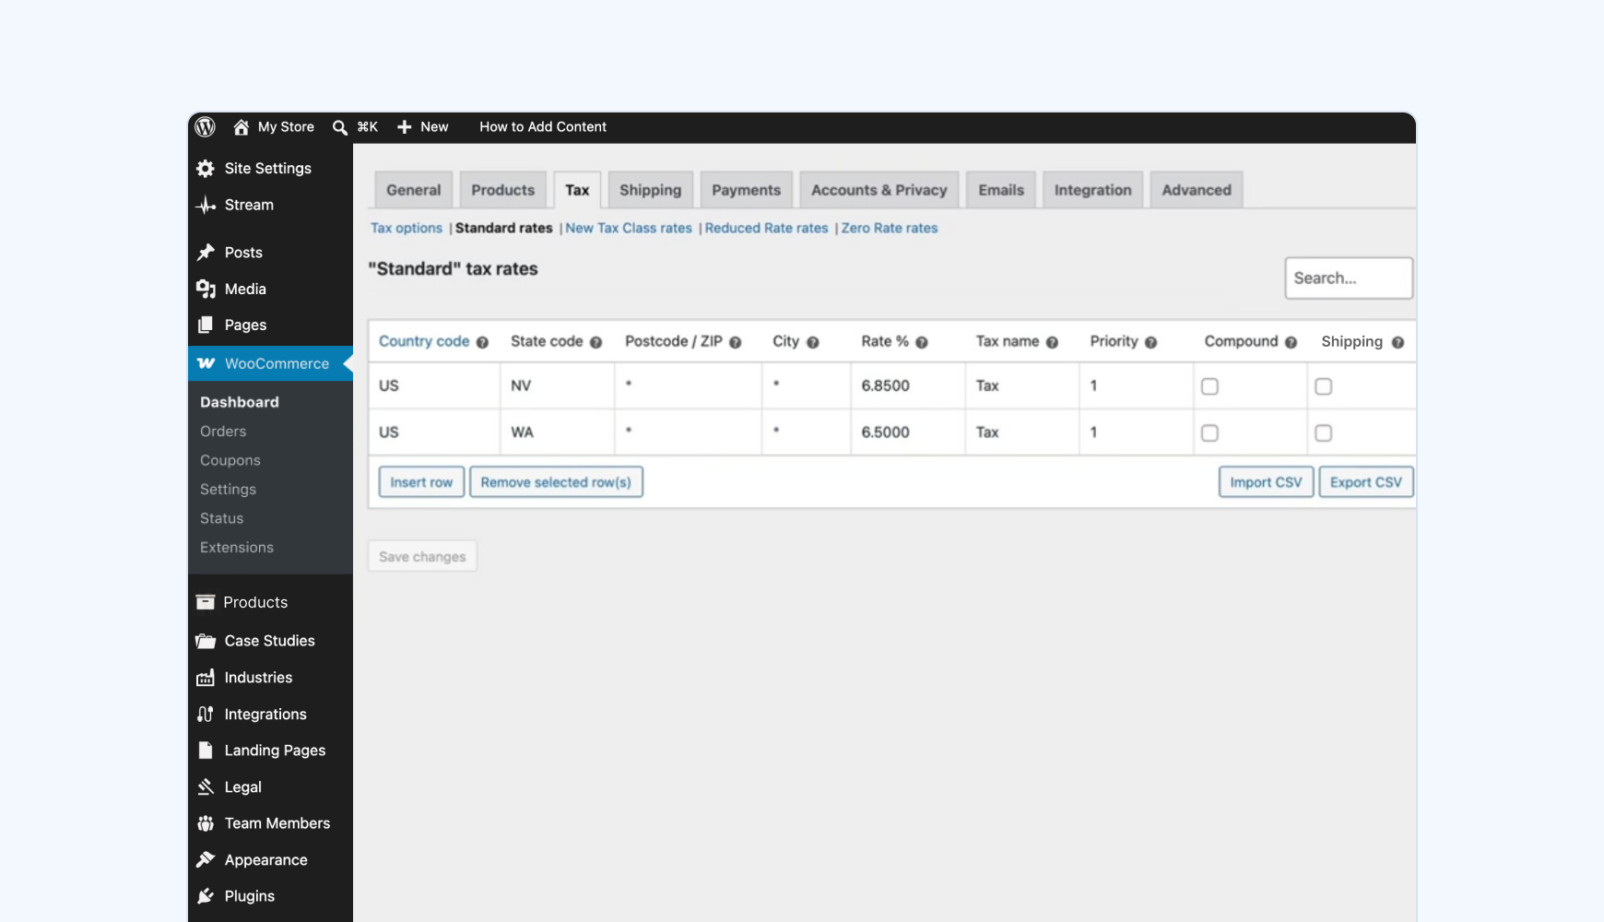
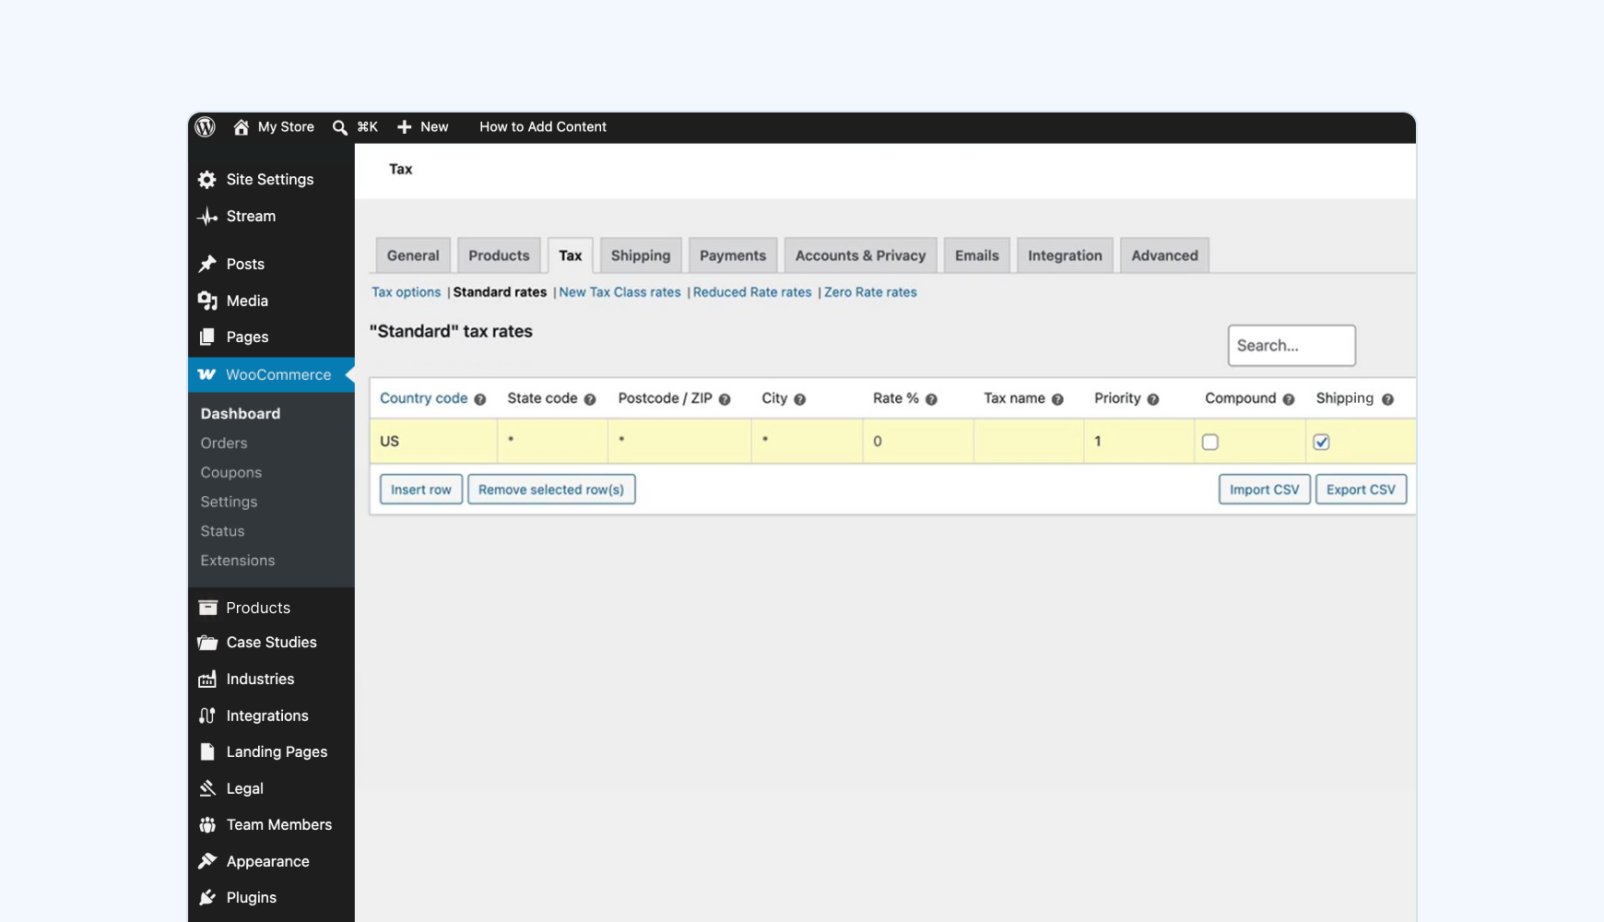
- Navigate to the Standard rates link below the Tax tab at the top of the Settings page
- Click Insert row to add a new tax rate. Each row configures sales tax for a single state
- Enter US as the country code and the two-letter state abbreviation (e.g. CA for California)
- Check the current sales tax rate for that state and enter it in the Rate % column. Add custom text to the Tax name column if you want a specific label at checkout — leave blank and it defaults to “Tax”
- Set Priority to 1 to ensure the correct rate applies if there’s a conflict
- Leave Compound unchecked — in the US, most orders are charged a single statewide rate
- Check the Shipping box if the state taxes shipping — leave unchecked if it doesn’t
- Click Save changes
Add a row for each state where you have nexus. WooCommerce doesn’t track economic nexus or tell you which states you have triggered (or are about to trigger) nexus. That’s on you to manage.
Selling in several states? Instead of adding rows one by one, create a CSV file with the same columns as the WooCommerce tax rate table and upload it in bulk. Click Import CSV below the table to upload.

TaxCloud tip
If you’re switching to TaxCloud from another provider, your historical WooCommerce order data doesn’t have to start from scratch. Upload your past transactions via CSV to get an accurate picture of your current nexus exposure across all states — before you configure anything. Learn more about TaxCloud’s CSV uploader.
Step 4: Configure reduced, zero, and custom tax rates
Standard tax rates apply to most products, but some items are taxed differently. WooCommerce includes two additional rate sets by default, and you can create custom ones for products with special rates.
- Reduced Rate — for products that qualify for lower rates, such as some food items, medical products, and agricultural supplies. Navigate to Reduced Rate below the Tax tab and add rates the same way you did for Standard rates.
- Zero Rate — for fully tax-exempt items. Navigate to Zero Rate below the Tax tab and add those products here.
To create a custom rate set (for example, alcohol or e-cigarettes with special rates):
- Click Tax options below the Tax tab
- Find the Additional tax classes box and add your new rate set name
- Click Save changes — the new rate set will appear alongside your existing ones at the top of the page
Step 5: Assign the right tax rate to each product
WooCommerce applies your standard tax rates to all products by default. If you have items that that shouldn’t be charged at your standard rate (for example, items that qualify for reduced, zero, or custom rates, like tax-exempt products or items with special rates), you need to update them individually.
- In the main WordPress sidebar menu, navigate to Products → All Products
- Locate the product you want to update and click Edit
- Scroll down to Product data and select the General tab
- Next to Tax class, select the correct rate from the drop-down menu
- Click Update to save your changes
Repeat for any product that shouldn’t be charged at your standard rate.

Exemption certificates and tax-exempt customers
WooCommerce lets you assign special tax rates to individual products, but not to specific customers. If you sell to tax-exempt wholesalers or B2B buyers, you’ll need a separate solution for managing exemption certificates — collecting them, storing them, and applying them correctly at checkout. See how TaxCloud handles exemption certificate storage, tracking, and management.
Step 6: Export WooCommerce tax reports
At this point WooCommerce is calculating and collecting sales tax at checkout. What it won’t do is file returns on your behalf. You’ll need to export your tax data and file with each state yourself, or use a third-party sales tax compliance partner like TaxCloud to automate that process.
To export your tax data:
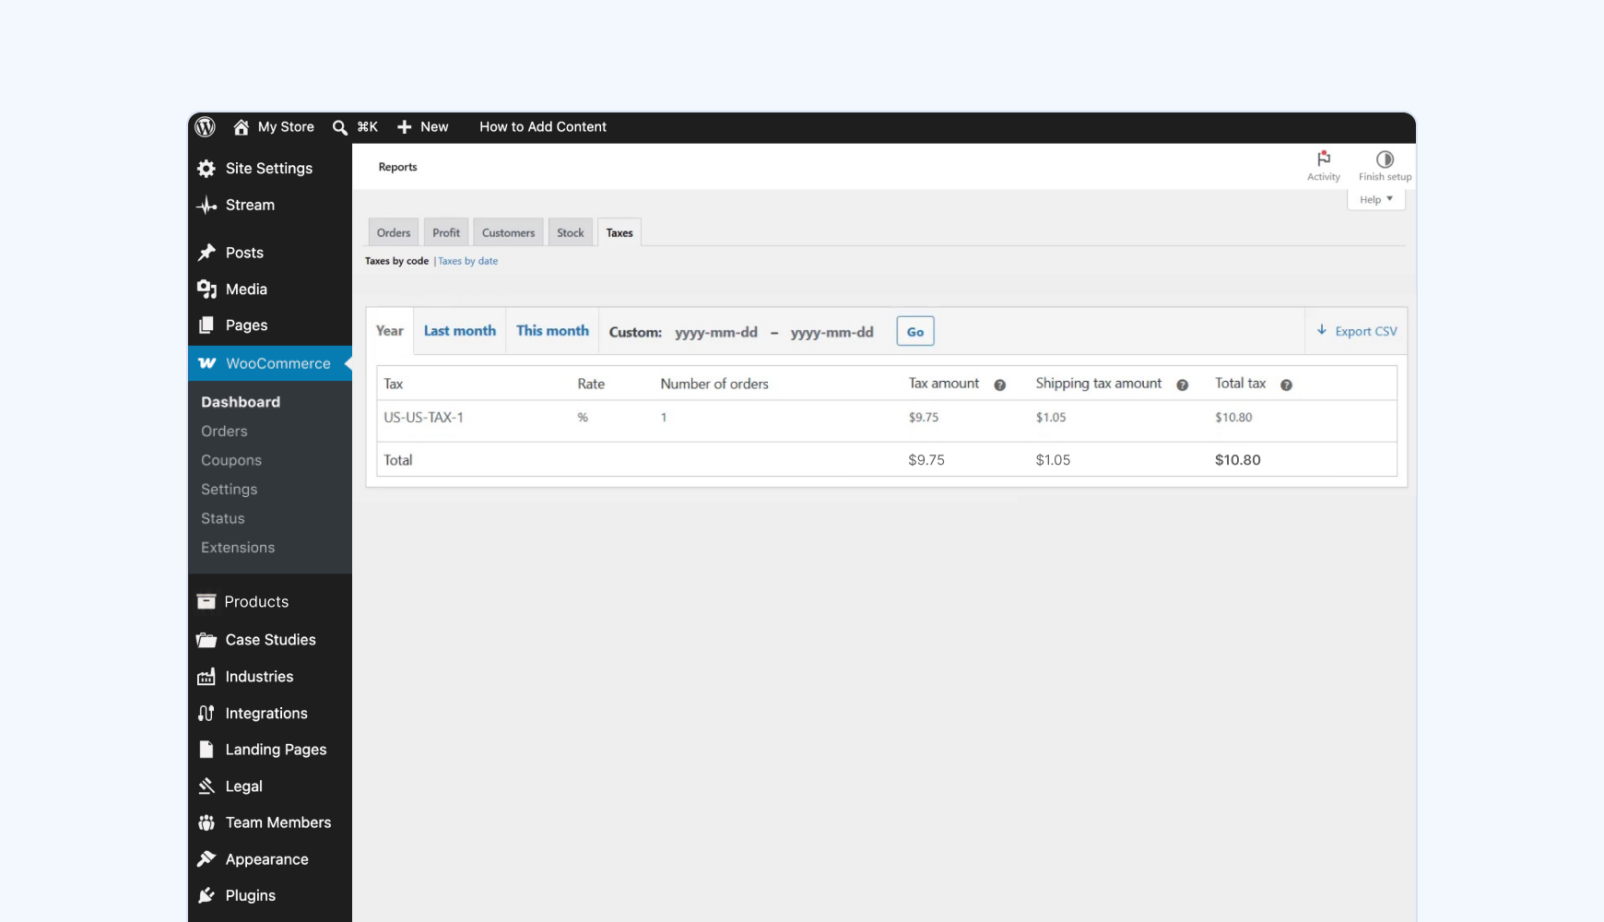
- In the main WordPress sidebar menu, navigate to WooCommerce → Reports
- Click the Taxes tab at the top of the page, then select Taxes by code
- Enter the date range you need, then click Go to generate a report showing total tax collected by state
- Click Export CSV to download the report
If you’d rather not file manually, TaxCloud’s WooCommerce integration automates filing across all 50 states starting at $39/return.
Don’t want to file manually?
Sales tax software that integrates with WooCommerce can automate filing across all 50 states starting at $39/return — so you can skip the spreadsheets and focus on growing your store. For a full breakdown of your options, check out our guide to WooCommerce sales tax filing software.
How to set up taxes using WooCommerce Tax
WooCommerce’s native settings require you to manually enter and maintain tax rates for every state where you sell. If a state or local jurisdiction changes its rate, your checkout will keep charging the old amount until you update it yourself — which creates real risk as you scale.
WooCommerce Tax, a free plugin, removes that maintenance burden. It fetches live, street-level rates at checkout automatically, so you’re always charging the correct amount without managing spreadsheets or CSV files. For sellers who want accurate rates without the overhead of manual table maintenance, it’s a straightforward upgrade from native settings.
Note that WooCommerce Tax still requires you to know where you have nexus and configure collection for those states yourself. It is a calculator, not a compliance tool — it won’t monitor your thresholds or file returns on your behalf.
Here’s how to set up WooCommerce Tax in your WooCommerce store.
Step 1: Install WooCommerce Tax
First, install and activate the WooCommerce Tax plugin.
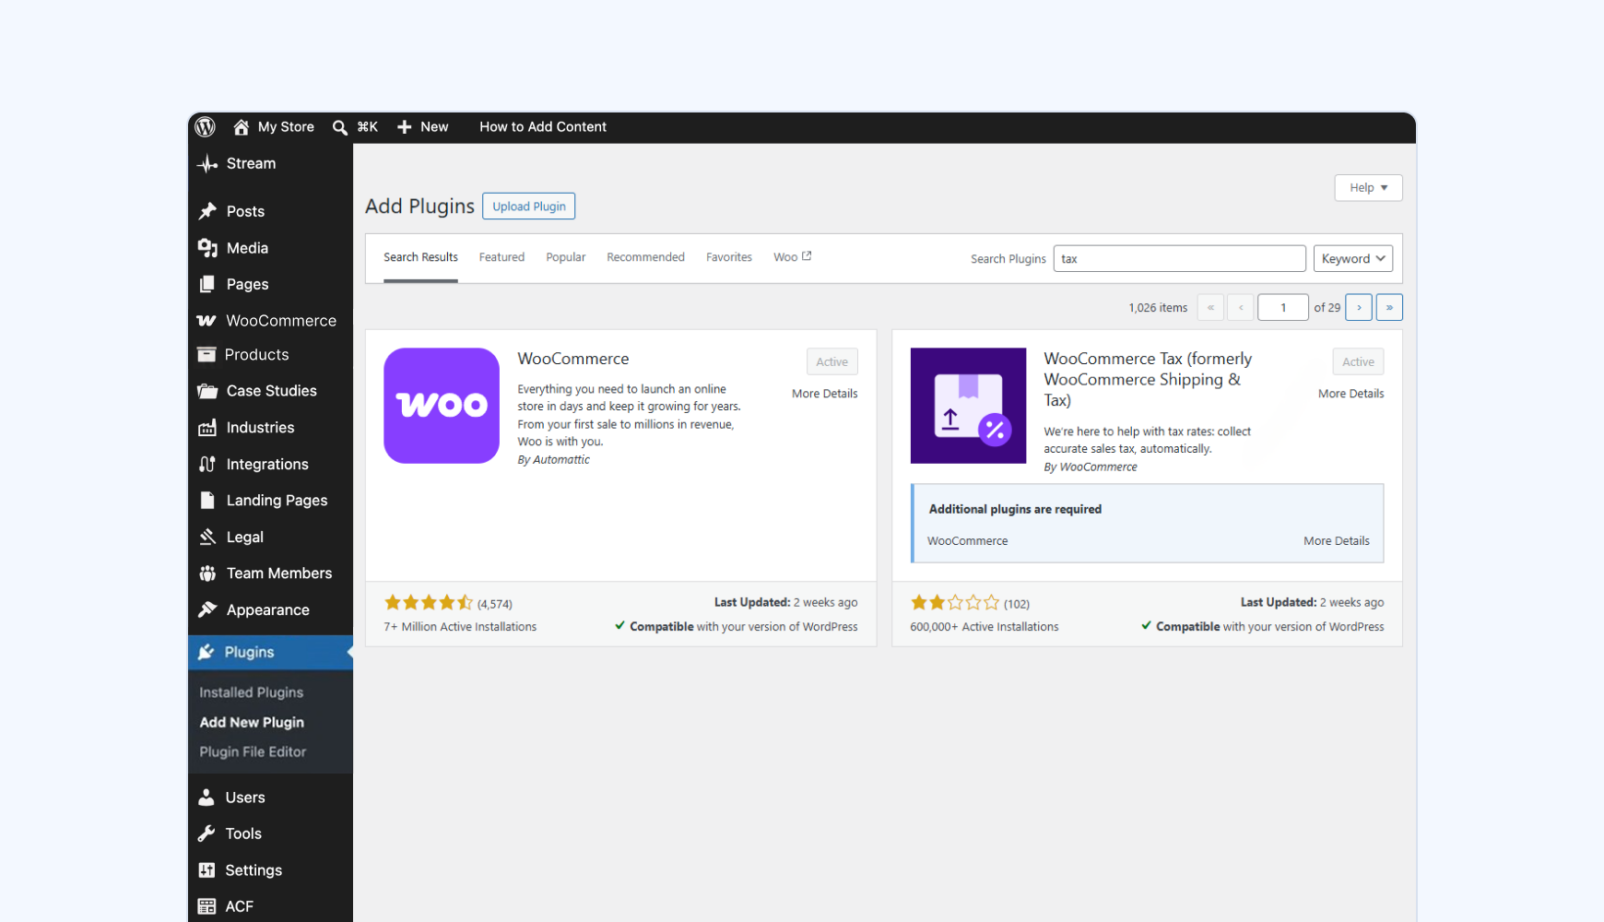
- Navigate to Plugins → Add New Plugin in the main WordPress menu.
- Search for WooCommerce Tax.
- Click Install Now, then Activate.
Step 2: Enable automated taxes
This is where you connect WooCommerce Tax to your store and switch from manual rate management to automated rate calculation. Note that enabling automated taxes locks most store-wide tax settings — WooCommerce Tax takes over and manages them for you.
- Navigate to WooCommerce → Settings in the main WordPress menu
- Click the Connect button in the banner at the top of the settings page
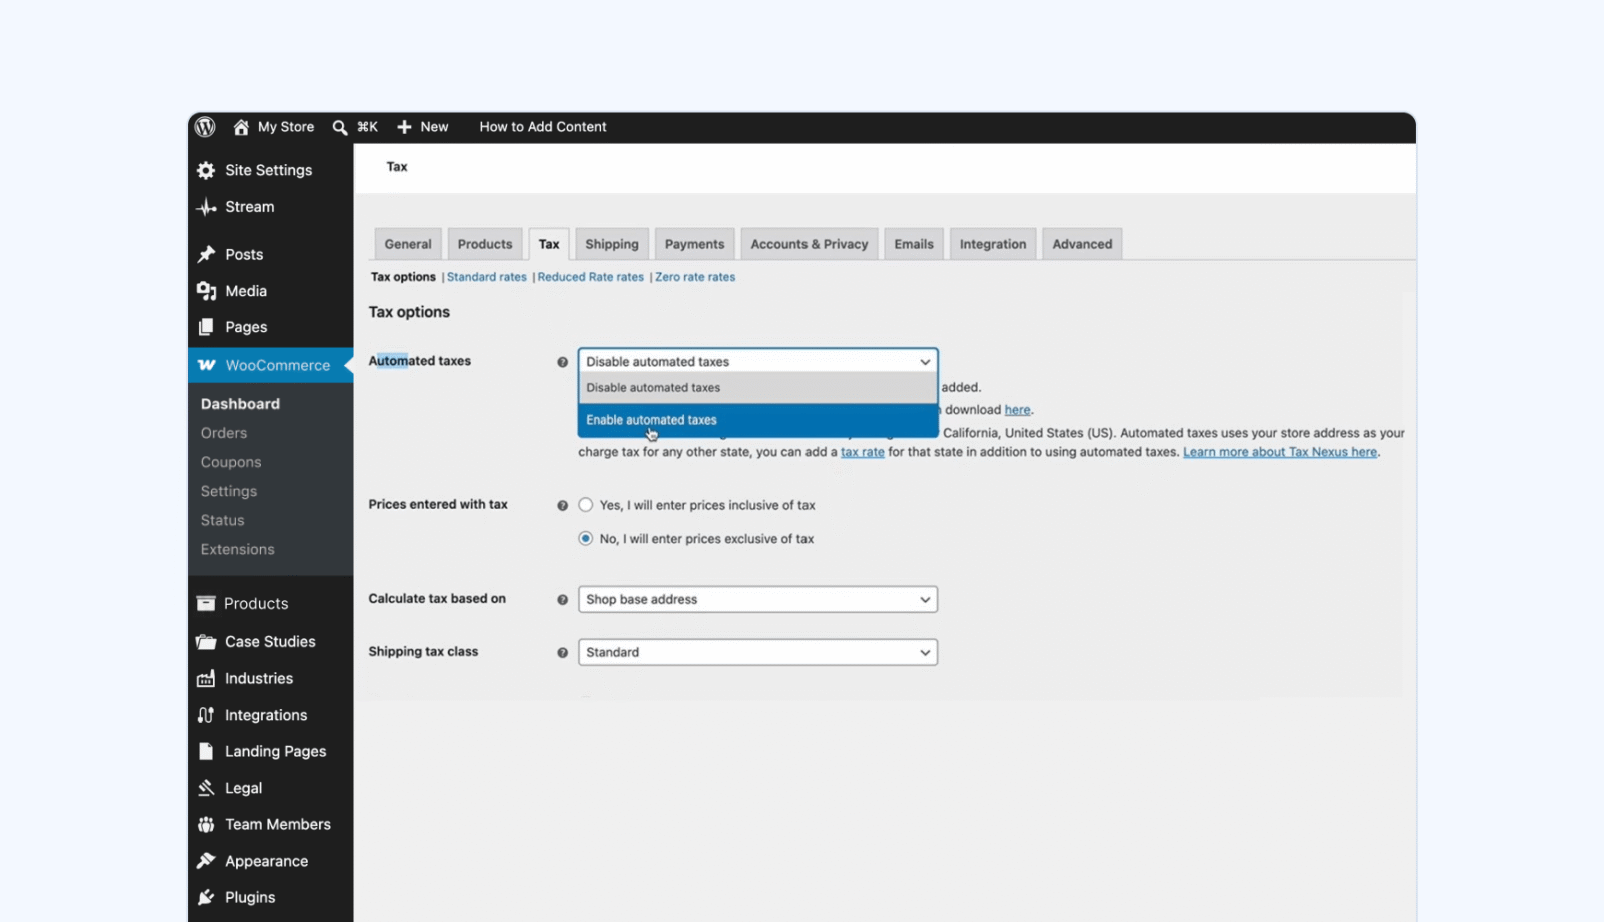
- Return to WooCommerce → Settings and select the WooCommerce Tax tab
- Next to Automated taxes, select Enable automated taxes
- Click Save changes
Once enabled, the following settings will be locked automatically and you won’t be able to change most store-wide tax settings.
- Prices entered with tax will be set to No, I will enter prices exclusive of tax
- Calculate tax based on will be set to Customer’s shipping address
- Shipping tax class will be set to Shipping tax class based on cart items
Step 3: Add tax rates for other states
WooCommerce Tax can automatically calculate sales tax rates for your home state and states you’re registered in — but it won’t add those states for you. If you need to collect sales tax in states beyond your home state, you need to add those rates manually.
When you enable WooCommerce Tax, it removes any tax rates you previously added manually. It saves them to a downloadable CSV first so you can restore them easily.
If you had manual rates set up previously:
- Under the Automated taxes dropdown, click the link that says Your previous tax rates were backed up and can be downloaded here
- Navigate to Standard rates below the Tax tab
- Click Import CSV below the table to upload your downloaded rates file
- If your file includes a rate for your home state, select that row and click Remove selected row(s) — WooCommerce Tax handles your home state automatically
If you’re adding rates for the first time:
Follow the steps in Step 3 of the native settings walkthrough above to add rates for each state where you have nexus.
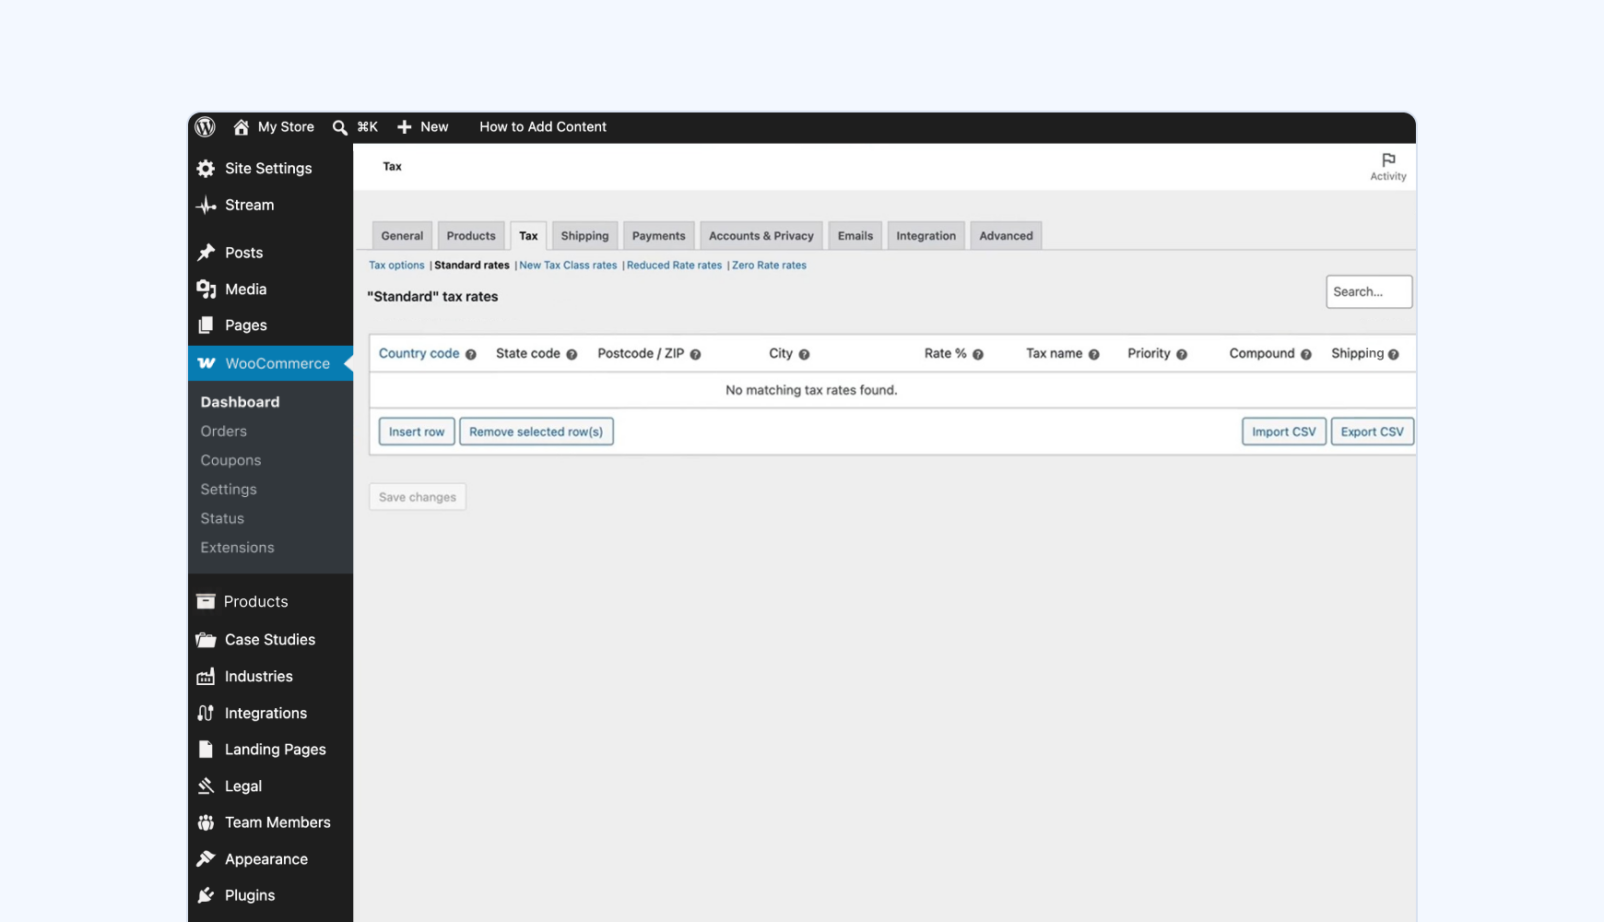
WooCommerce Tax does not track nexus or file returns for you
WooCommerce Tax is a sales tax calculator, not a compliance tool. It won’t track or flag if you have or trigger nexus (and therefore sales tax obligations) in a state — that’s on you to manage separately. It also won’t register to collect sales tax in a new state or file returns on your behalf.
How to track economic nexus as a WooCommerce seller
Neither WooCommerce’s native settings nor WooCommerce Tax track economic nexus. Both tools calculate tax in states you’ve already configured — but neither monitors your sales against each state’s economic nexus thresholds or tells you when you’ve crossed one.
That’s a problem as you scale. Most states trigger economic nexus at $100,000 in gross sales or 200 transactions within a rolling 12-month period. Cross a threshold without realizing it and you’re exposed to back taxes, penalties, and interest — often discovered only when an audit notice arrives.
The risk is even higher for multi-channel sellers. If you sell on Amazon, Etsy, or other marketplaces in addition to WooCommerce, those sales count toward your thresholds in most states — but they won’t appear in your WooCommerce reports. You could be crossing thresholds across multiple states without knowing it.
What to do when you hit an economic nexus threshold
Once you cross an economic nexus threshold your obligations begin immediately:
- Register for a sales tax permit with the state’s department of revenue. Link: taxcloud.com/multi-state-sales-tax-registration/
- Configure collection in WooCommerce — add the state’s tax rate to your settings
- Set up filing — WooCommerce doesn’t file on your behalf. Use a third-party plugin or file manually. Link: taxcloud.com/blog/woocommerce-sales-tax-filing/
To learn more about managing economic nexus obligations as your business expands across more states, read our guide: How your nexus obligations change as you scale.
Track nexus automatically across all your channels
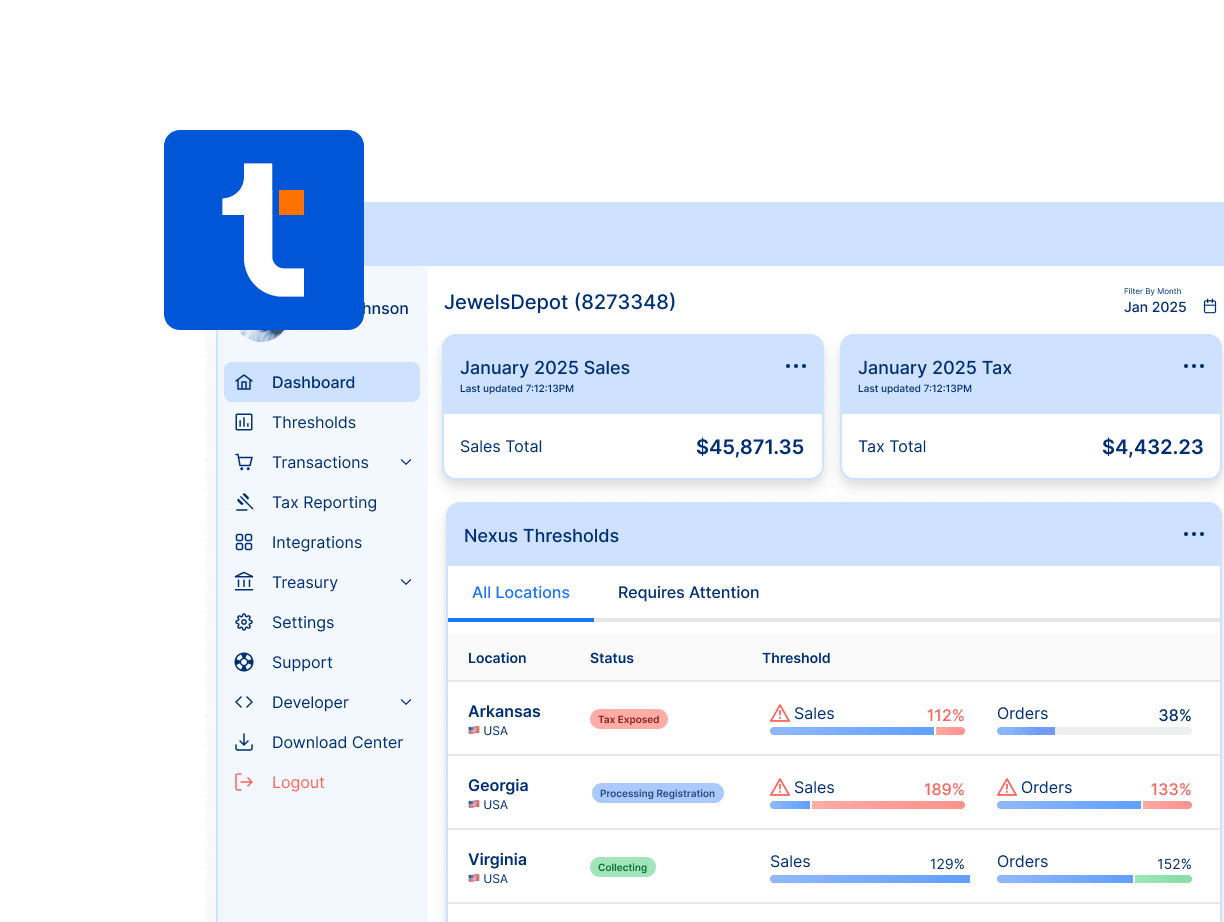
To help you monitor nexus automatically across all your channels and marketplaces — WooCommerce, Amazon, Etsy, other marketplaces, and more — TaxCloud’s economic nexus tracking monitors your sales against state thresholds in real time and alerts you before you cross one.
When to use a WooCommerce sales tax plugin
WooCommerce’s native tools and WooCommerce Tax handle calculation. They stop short of nexus tracking, registration, filing, and remittance. A dedicated plugin fills that gap.
Consider a third-party plugin if:
- You sell across multiple states. Managing registration and filing deadlines across multiple states manually is time-consuming and error-prone.
- You have multiple sales channels. Economic nexus thresholds apply to all your sales, not just WooCommerce orders. You need a tool that consolidates everything in one place.
- You want to reduce filing costs. As a Certified Service Provider under the SST program, TaxCloud gives eligible businesses free registration and filing in 24 states. Most sellers filing in 10+ states save thousands annually compared to managing returns independently.
- You’ve received a state notice. A notice is a signal that your current compliance setup has gaps. A dedicated plugin from a sales tax compliance platform that provides audit support gives you audit-ready records and expert support if a state comes knocking.
The three main options:
| Plugin | Best for | SST Program | Automated Filing | Pricing |
|---|---|---|---|---|
| TaxCloud | Mid-market multi-state and multi-channel ecommerce brands | ✅ 24 states free | ✅ All 50 states | Starter from $19/mo, $39/return (down to $20/return with volume discounts) |
| TaxJar | Small sellers starting out with a lot of marketplace orders | ❌ | ✅ All 50 states | TaxJat Professional plan from $99/mo, 55/return |
| Avalara | Enterprise, international businesses with complex product catalogs | ✅ 24 states free | ✅ All 50 states | Custom quote (see how Avalara pricing works) |
The right choice depends on your sales volume, number of states, and whether SST savings apply to your business.
For a detailed breakdown, check out our guide: The best sales tax plugins for WooCommerce.
How to stay fully compliant as your WooCommerce business scales
Once you’re filing in multiple states, manual management breaks down fast. Missed deadlines, state notices, reconciliation errors across channels — the overhead compounds quickly. That’s the point where sales tax stops being an afterthought and starts being a real operational risk.
TaxCloud’s WooCommerce integration handles what WooCommerce can’t:
- Nexus monitoring across all channels — WooCommerce, Shopify, custom stores/websites and more
- State registrations done for you in new states when you cross a nexus threshold, so you don’t have to navigate each state’s department of revenue yourself
- Automated filing starting at $39/return, dropping to $20/return with volume
- Streamlined Sales Tax (SST) Program participation which gives eligible sellers free registration and filing in 24 SST-member states
- Real experts available to help when something comes up — US-based support from people who actually understand sales tax
- Audit support if a state tax agency comes knocking, TaxCloud provides documentation and representation support so you’re not handling it alone (add-on service)
TaxCloud for WooCommerce is available on the WooCommerce Marketplace and the WordPress plugin directory — same integration, two entry points. WooCommerce integration requires the Premium plan.
TaxCloud was one of the only companies with a direct WooCommerce integration — and it just worked. When you need help, you get a real person who knows your account and the intricacies of sales tax.

Stop letting sales tax slow you down
TaxCloud handles the compliance work that WooCommerce can’t — so you can focus on growing your business.
WooCommerce sales tax setup — FAQs
Whether you need to charge sales tax on shipping depends on what state your products are being shipped to. Most states require you to charge sales tax on shipping if the products being shipped are taxable. WooCommerce doesn’t let you adjust shipping taxes on a state-by-state basis, but sales tax plugins like TaxCloud calculate tax on shipping automatically.
If you primarily sell in the US, you should set WooCommerce prices exclusive of tax. Most US customers expect that the prices they see don’t include sales tax, and that tax charges will be added at checkout. In addition, setting prices exclusive of tax ensures that you charge the same base price for each product regardless of what state the customer lives in.
Yes, WooCommerce Tax is a free extension for WooCommerce that calculates sales tax automatically for your store. However, WooCommerce Tax doesn’t track economic nexus or help you file sales tax returns.
WooCommerce doesn’t file sales tax returns on your behalf. You must generate tax reports for each state where you sell using the built-in Reports tool, then file taxes yourself. Alternatively, sales tax plugins like TaxCloud for WooCommerce can automatically file taxes on your behalf.
TaxCloud for WooCommerce is the best sales tax extension for WooCommerce. It automates economic nexus tracking, sales tax calculation, registration, filing, and audit defense. TaxCloud participates in the SST program so you can qualify for free filings in 24 states and offers responsive US-based customer support.